Tuesday 24 February 2009

Bhopalyacha Bharit (Pumpkin Salad)

Or Butternut Squash Bharit to be precise. That is what is easily available here and that is what I used to make this classic Pumpkin side, which was almost like the real thing.

I have come across a lot of people who call this by different names, all valid, I should add - Salad, Koshimbir or Bharit. This is my favourite way of having pumpkin. Use the flesh for this Bharit and make chutney out of the peel on the lines of this one.

I cant really think of anything else to say today, so here simply is the recipe.

Bhopalyacha Bharit

Picture 190

Serves 2

Ingredients

  • 1 cup Pumpkin/Butternut Squash cubes
  • 1/4 cup Curd
  • 1 tblsp Ghee (Clarified Butter) or Oil
  • 1 tsp Cumin seeds
  • A pinch of Asafoetida
  • 1/4 tsp Turmeric Powder
  • 6-8 curry leaves
  • 1 Green Chilli, finely chopped

Method:

Boil the pumpkin cubes until soft and set aside to cool.

Picture 185

Once cool enough to handle, mash them coarsely with the back of a fork.

Add the salt and curd and mix well. Adjust the quantity of curd as per your preference.

To prepare the tempering, heat the oil/ghee and once hot add the cumin seeds. As they begin to sizzle add the Asafoetida, turmeric powder and curry leaves.

Add the green chilli, give it a stir, switch off the flame and add the tempering to the above prepared Bharit and mix well.

Serve as a side with Chapati/Roti.

Note: Using Ghee for the tempering gives it a very special & unique taste.

Tuesday 17 February 2009

Baingan ka Bharta (Roasted Aubergine Stir Fry)

Does that translation do justice to the good old Baingan ka Bharta? What do you think? Is there any other name by which it is known? I would really like to know. I tried to google for it and found that everyone has their own term. So, there, I add mine to the lot - Roasted Aubergine stir fry!

Now, Brinjal/Aubergine/Eggplant is a very dicey (pun?) veggie, meaning some love it, some loathe it and some don't care and its very hard to determine which category, a given person would be in. It can be assumed that most people will not like Karela (Bittergourd) but the same can not be said about Aubergine. While my bro D is a self confessed Brinjal hater, I have met people who can have it for all the 3 meals in a single day. Me? I don't mind having it once in a while and actually like it too.

Especially this Bharta. There are two ways a Baingan Bharta can be made. Both of them involve roasting the Aubergine first. The main difference in the 2 methods is that in the first, the Aubergine is not cooked again once it is roasted, whereas the second involves cooking it again for a few minutes along with spices and other ingredients. I prefer the second type and will be presenting it here in this post. The first method will also be posted some time in the future.

Coming to roasting the Aubergine, there are two ways to do it. Either on the stove top or in the oven. While the stove top method is the one that yields the best result and is quicker, the oven takes a very long time and the smoked taste which is very important for the Bharta is not achieved. But again for the second method of making the Bharta, where the Aubergine is going to be cooked again after roasting, this doesn't really matter. But the oven has another drawback namely the time factor. It really takes a long time, almost an hour or even more to get it roasted. But this might be the only option for people with an electric plate!

I alternate between the two roasting methods depending on the amount of time I have on hand, my mood and whether I have just cleaned the gas hob (The roasting makes a lot of mess!)

Baingan Ka Bharta

Baingan Ka Bharta

Serves 2

Ingredients

  • 1 Large Aubergine (Fat as well as Long!)
  • 1 Medium sized onion
  • 1 Medium sized Tomato
  • 1/2 tblsp oil
  • 1 tsp Mustard seeds
  • 1/2 tsp Cumin seeds
  • 6-8 Curry Leaves
  • 1/4 tsp Asafoetida (Hing)
  • 1/2 tsp Turmeric Powder
  • 1/2 tsp Red Chilli Powder
  • 1 tsp Goda Masala (Maharashtrian Spice Mix, alternatively you can use this Sambhar Powder)
  • Salt
  • Fresh Coriander leaves, chopped

Method:

Roast the Aubergine

  • For the oven, apply some oil to the surface of the Aubergine, keep it on a baking tray and place this in the oven at 220 deg C. No need to pre heat as the Aubergine will get cooked even while the oven is heating up. Check on it after about 20-25 min and turn if required. It should be completely done in another 20-25 min or so.
  • For the stove top method, light the the gas burner and place the Aubergine directly on the flame. Keep changing the sides to expose each part to the flame until the skin is well charred and starts to peel off.

Roasted Aubergine

Once the Aubergine is roasted. the skin will peel off easily. Remove the skin and roughly chop it and keep aside till needed.

Heat the oil in a Pan and add the mustard seeds and Cumin seeds.

Once they splutter, add the curry leaves, Asafoetida and Turmeric powder.

Next, reserve about 1 tblsp of chopped onions and add the remaining to the tempering and saute.

When the onions turn translucent, add the chopped tomatoes, again reserving 1 tblsp of it.

Cook till the tomatoes turn mushy and then add the Goda Masala or any other spice mix that you are using (I prefer the Sambhar Powder) and the red chilli powder. Mix well and cook for another minute.

Add in the roasted & chopped Aubergine along with the salt and mix well. Cover and cook for 3-4 min on a low flame.

Remove the cover and add the reserved onion & tomatoes along with chopped coriander leaves. Give it a stir and Switch off the flame.

Serve hot with Chapatis/Rotis.

Wednesday 11 February 2009

Raw Tomato Chutney

Raw Tomatoes are rare to find where I stay, so when I saw them at a vegetable stand, I filled up my bag, about 18-20 of them. I brought them back home happy with the loot & then started wondering what I will do with such a huge lot.

The Chutney was of course the first thing on my mind but I did not want to make it out of all the tomatoes because I wasn't sure if such a huge quantity will survive in the fridge for long. Lets keep half the tomatoes as they are, if we aren't able to do anything with them, they will ripen & then we can use them as normal tomatoes, we decided.

But the tomatoes never got a chance to 'age'. The chutney made with half of them got over in no time & within 4 days I was making the second lot, yes the same chutney, which also got over in 3 days time. This was some 2-3 weeks back and I am already missing it and looking forward to finding some more tomatoes in the market!

Basically, I love this chutney. This and a few more made in a similar way - Pumpkin peel, Ridgegourd peel etc. The addition of Til (Sesame) makes them very unique.

These chutneys were a regular at our home, the favourite one being the Ridgegourd peel. While we used a Mixer/Grinder, back in the village, the chutney was ground on stone and had a unique taste of its own. It would then be served with Hot Bhaakris (Jowar Flatbreads). The ritual after that was to make a small hole in the chutney mound and raw Peanut oil would be poured in, mixed and then devoured. Nobody had heard of cholesterol over there or rather they never had to, since right after this meal, most of them would be seen toiling hard in the fields, except of course us vacationers!

Raw Tomato Chutney

20Aug08 008

Ingredients

  • 1/2 cup Til (Sesame seeds)
  • 8-10 medium sized Raw(green) Tomatoes
  • 6-8 Green Chillies (Alter acc to taste)
  • 8-10 Curry Leaves
  • 2-3 Garlic cloves
  • 1 tblsp Tamarind pulp
  • 1-2 tblsp grated Jaggery (Acc to taste)
  • Salt

Method

Lightly roast the sesame and keep aside.

Heat oil in a Pan. When hot, add the curry leaves & fry them for a minute.

Add the green chillies and fry well for about 3-4 min on low flame. Add the Garlic cloves and continue to fry for another 2 min.

Wait until the Chillies are properly roasted & then add the chopped tomatoes.

20Aug08 007

Roast them until they turn soft & mushy. At this point switch off the flame and add the grated Jaggery and tamarind pulp.

Allow this mixture to cool. Then add the salt & the roasted sesame seeds and then grind it to a coarse/fine consistency depending on your preference. As far as possible, avoid using water for this. If you have to add water, do it spoon by spoon.

This chutney, is a great accompaniment to the daily meal (both Chapati & rice) and also tastes delicious spread on toast.

Note:

If the chillies are not roasted properly, the chutney turns out to be very very hot without any real taste of the tomatoes, so be careful & make sure they are properly roasted/fried in the oil.

The qty of Jaggery can be adjusted according to taste, I personally don't like it very sweet so I use only 1 tblsp but anything up to 2 tblsp should be acceptable.

The sesame seeds can be replaced by peanuts but there will be a slight change in the taste. This will also taste good but different. If you have problem grinding this with the tomato mixture, dry grind it after roasting and then mix it with the tomato mixture for the final grinding.

This Chutney goes to Ramya's Mane Adige for her Chutney/Dip Mania event.

Friday 6 February 2009

Sambhar Powder on a snowy day....

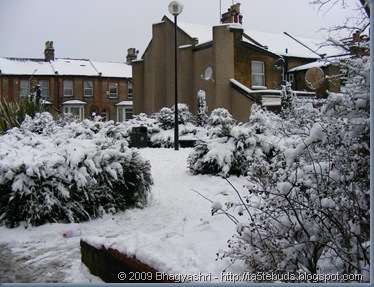
On Monday, 2nd Feb, we woke up to lots & lots of snow. It was beautifully white everywhere and all three of us couldn't budge from the window, taking in the scenery, well it was just the parking lot that we could see but it was beautiful nevertheless. Trees laden with snow, all the vehicles covered with snow (little S was trying hard to recognise which one was our car!), everything looked spotlessly white!

Picture 085

As we turned our attention to the real world, we came to know that there was no transport. The bus service was pulled out the previous night itself. Even the tube lines were not an option with all of them suspended or at least part suspended. So GM was 'forced' to work from home. I say forced because we don't really like that option and its mainly because of S. When Papa is at home he is supposed to be paying attention exclusively to S, he cant be doing anything else. So it gets very difficult for him to get his work done and even more difficult for me to hold S back and keep her engaged.

But Monday was a little different, we were glad that GM was at home, even though working. The work was light so he could play with S while working and I got some much needed free time. And how did I utilise it? I cooked away to glory in the kitchen :) There was Gajar ka Halwa (Finally updated the post with a pic)!, Wada-Pav (A must in the given weather, I say) with the famous Pav from Jugalbandi (I am cooking so much from them theses days that my posts seem to be incomplete without a mention!) & Pulao for lunch (recipe to follow..). But the most important one that I could make on that day was the Sambhar Powder. This was due for such a long time now, that we had actually forgotten the taste of the real Sambhar! The store bought powders do no come anywhere close to the home made one!

Now for some background on the Sambhar powder and Sambhar itself.

It is said that no two persons' Sambhar taste the same.

Said by people who have had a chance to sample Sambhar from more than 2-3 sources excluding the restaurants of course! BTW if you notice, the above saying is true for the restaurants too. I have never seen the taste of the Sambhar getting repeated in different restaurants!

My association with home made Sambhar dates back to the time I stayed with N & her family. Manni used to make the yummiest Sambhar I have ever tasted till today. But even as I am typing this out, I can see N's younger sister shaking her head and saying that their granny, Manni's mother, makes it better!  Manni made the Sambhar exactly the way her mother used to make, but it seems, it never turned out to be the same. She then thought it might be the difference in the basic Sambhar powder itself. So she called her mother home, and made it  under her supervision. I know, I was there to see it :) That afternoon Granny made the Sambhar and everyone said it was great, even N's sister. But the next day when Manni made the Sambhar using the same spice mix and the same procedure, it turned out, well a little different, the best in my opinion, but still different. How do you explain that?

Anyway, since I liked it Manni's way, I took down the proportion for the spice mix and observed how she made the Sambhar. Armed with this knowledge I came back home and impressed my Mom by making the Sambhar powder all by myself (I was still in college then) and subsequently the Sambhar too. Everyone liked it so much that I was praised in front of each & every person who happened to visit us for the next month or two, even the house maid! 

But I was not happy because it was not at all like Manni's! It was good but not the same thing. Till date I have not been able to match the same taste, even though everyone including GM love the Sambhar that I make. I keep trying to make variations so as to achieve that taste but the trials are still on.

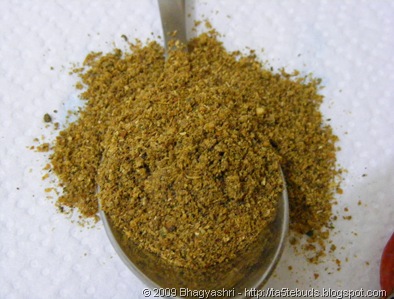
So here it is then, the Sambhar powder that I am raving about so much. I am giving the proportions exactly as I had it written down from Manni. It starts with 5 bowls of coriander seeds. Now the bowl can be anything from a teaspoon to a cup, it only gives the proportion, adjust according to the quantity that you would like to make. I always take the quantity of the Coriander seeds as the base and adjust the other ingredients accordingly.

Picture 212


  • 5 bowls, Coriander seeds (Dhaniya)
  • 1 bowl Cumin seeds (Jeera)
  • 1/2 bowl Black Peppercorns (Kali Mirch)
  • 1/2 bowl Mustard seeds (Sarson/Rai)
  • 1/2 bowl Fenugreek seeds (Methi Dana)
  • 5 tblsp Split chickpea (Chana Dal)
  • 5 tblsp split blackgram without the skin (Udad dal)
  • 3 Nos of 2" pieces of Cinnamon (Dalchini)
  • Leaves from 10-12 stalks of Curry Leaves
  • 1/4 Kg Dried red chillies (Note 1)
  • 1/4 bowl Turmeric powder (Haldi)
  • 1-2 tblsp Asafoetida (Hing)

Note 1: Since I can never be sure how hot the chillies are as I don't know the variety I am getting in the packets, I always take a nominal quantity, say 8-10 chillies, for 5 bowls of Coriander seeds. I then add the required red chilli powder while making the Sambhar to adjust the taste.

Picture 207

Dry roast each item separately, allow to cool and then grind to a fine powder, separately again, except for the Turmeric and Asafoetida. Here is a 'roasting guide' for each item.

Coriander seeds: Roast them on a low-medium flame as they tend to get burned very easily. Once roasted, the seeds let out a nice aroma and the colour changes to light brown.

Cumin seeds: Same as above but the flame has to be lower.

Black Peppercorns: The change in the appearance after getting roasted is not very clear and there is no aroma as such. They can be roasted on a med-high flame for about 2-3 min.

Mustard seeds: Roast them on medium heat. They change colour and for once its totally the opposite effect. They go from a darker shade to a lighter colour and also start popping, just like they do when added in the oil for tempering. And they smell like gun powder, I mean the one that is filled into crackers! I am always reminded of Diwali night and fire crackers when I am roasting mustard seeds :)

Fenugreek Seeds: The lowest flame. They change colour quite fast and get burned in no time. Keep an eye for the first signs of colour change, wait for about 10-15 seconds and remove from fire.

Split Chickpea: Can be done on a medium high flame. Changes colour and lets out an aroma as well. Take care not to burn it.

Split Blackgram: To be done on a medium low flame, since they take lesser time than Chickpea.

Cinnamon: Break the pieces into smaller bits and roast them. Again there is no significant change in the appearance, but it does let out a bit of an aroma. Roast on medium flame for about 2-3 min.

Curry Leaves: This looks to be easiest but in reality its the toughest. If the roasting is not done properly, that is if the leaves have not dried completely, they will not grind well. Roast them on medium heat until you hear each leaf crackling when you press down with a spoon. In case it still doesn't grind to a fine powder, sieve the ground mixture and discard the coarse part.

Dried Red Chillies: I recommend that this be done as the last thing before you shut the kitchen door and relax in the living room for at least 15-20 min, with the kitchen window open & the exhaust running on full blast! But again, this need not be roasted for a very long time, just 2-3 min on medium low flame should do.

Picture 159As you grind each item, combine the powders in a large bowl. Add the Turmeric powder and the Asafoetida and mix well.


Store in a dry container and use for Sambhar, Bisibele Bhaat, vegetable preparations etc.

Picture 216

We did have fun in the snow, BTW. Little S enjoyed her first time in the snow even though her hands were aching from the cold in spite of wearing gloves and the rest of the 'gear'!