Sunday 31 August 2008

CLICK: Citrus

My daughter S, who is all of 15 months now, has a lot of toys. 3 big boxes full actually. So much so that nowadays whoever enters the house is greeted by the 6 teddy bears(different sizes), 3 doggies, 2 elephants, 3 balls, rattles, building blocks, rings, a variety of Fish and so on.

Among these  is a set of artificial fruits made up of non toxic plastic-rubber material which make a sound similar to the auto rickshaw horn, when pressed. These were ideal for S, when she was teething (she still is!), she could chew on them all she wanted :) Out of these fruits banana, apple & orange are very much like the real thing.

But when it comes to playing, S prefers things from the kitchen. Utensils, dabbas (boxes) empty as well filled ones, rice & moong dabbas being her favourite, plates, bowls anything & everything that is in her reach. She doesn't even spare the fruits & vegetables, if she happens to lay her hands on them.

On one such occasion last week, she brought the oranges out from the kitchen into the living room or rather her playground. While we were playing with her, GM accidentally picked up the real orange thinking it to be the fake one and was wondering why it was not making the sound. We had a hearty laugh when we realised what it was.

So the next day I reversed things a bit, instead of S getting things from the kitchen into the living room, I took her toy orange into the kitchen and grouped it with the real oranges and went clicking.

 20Aug08 213

This is my entry for this month's CLICK - Citrus event.

Friday 29 August 2008

Pav Bhaji with home made Pav from Jugalbandi

Pav Bhaji is a regular with us for many reasons. First & foremost because we love it so much! Then, the simplicity of the recipe and a feeling of having had something special for lunch/dinner :)

GM makes great tasting Bhaji and I have still not been able to match that although I follow the same recipe and both of us use the same Masala powder! But he is too modest to admit that and prefers that I make the bhaji every time. And no he is not trying to escape the working in kitchen because when we make Pav Bhaji he is the one who chops the vegetables and gets everything ready most of the time :)

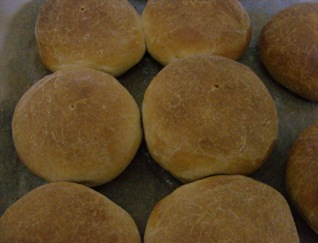
So, while we get to eat the almost authentic Bombay restaurant style Bhaji, what we miss, or rather used to miss is the Pav. We get a lot of different breads here, soft buns, burger buns, rolls, baguettes and so many more but not the real Ladi Pav which, if you ask me, is a must for that authentic feel to Pav Bhaji.

Imagine my reaction when I saw the recipe for these Pav along with a host of information about the same and the very necessary Amul Butter at Jugalbandi! I was happy and apprehensive at the same time. Finally there was a possibility that we could have real Pav with the bhaji now, but I was apprehensive because I had never tried my hand with Yeast baking before, meaning I had never ever made bread at home. But on seeing the easy recipe was totally tempted to try it.

So on Friday, we had Pav Bhaji with the real Pav! But as always I was so excited & in a hurry to try them out that I misinterpreted one step and applied the butter on the surface much earlier than was required, the result being that the outer crust of the Pav turned out to be a little crispier.

Now, Jai & Bee, as always have given the healthier option of using whole wheat, but since I wanted the 'authentic' Pav and was ready to forego the health part, I used Maida (Plain flour) instead.

20Aug08 427

I am sending this to Zlamushka for the Tried & tasted event, where Jugalbandi is the featured blog of the month.

Recipe for the Bhaji

Ingredients

  • 4-5 medium sized Potatoes
  • 1 small Green Capsicum
  • 1/2 cup Green peas
  • 5-6 florets of Cauliflower
  • 1 medium sized onion, finely chopped
  • 3 medium sized tomatoes
  • 2-3 cloves of garlic
  • 2-3 Green chilies
  • 3 tsps Pav Bhaji Masala
  • 1-2 tsp Red Chili Powder
  • 3-4 tsps Fresh Coriander leaves, chopped
  • 2 tblsp butter for the Bhaji and lots more for the Pav
  • Salt
  • Finely chopped onions, lemon slices & fresh coriander

Method:

Boil the potatoes, peel, mash & keep aside.

Boil the other vegetables as well - peas, cauliflower, capsicum in this case. You can use a lot of other vegetables but we prefer to keep it simple and use only the above mentioned, cauliflower also getting axed sometimes. Once they are boiled, mash these too and keep aside.

Grind together the green chilies and the garlic to make a paste.

Heat the butter in a pan and fry the onions. Continue to fry till the onions start turning brown. At this point add the chilies-garlic paste and fry for some more time(abt 3 min). The bhaji gets a lovely colour because of the browning of the onions.

Add in the chopped tomatoes and cook till they are tender.

Add the Pav Bhaji Masala, red chili powder and salt and saute. Once the spices are mixed thoroughly add the mashed potatoes and mix.

Add the other mashed vegetables and mix and cook on medium flame.

If the bhaji is very dry add a little water to thin it out, as little as possible. Adding too much water will spoil the consistency of the bhaji and also affect the restaurant style taste. In fact the bhaji made in restaurants does not have any water at all and the semi solid consistency is obtained by adding huge amounts of butter to the bhaji while mashing it on a large Tawa (Griddle). Since this is practically not possible at home, I add a little bit of water.

Add the chopped coriander leaves and give it a stir and let it heat for another 5 min before turning off the flame.

To serve, slit the Pav into halves and roast them on a griddle with lots of butter. You cant get stingy with the butter here, its a must!

20Aug08 436

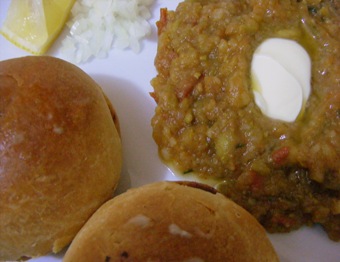
Serve the Bhaji with a dollop of butter along with the Pav, chopped onions, lime slices and garnished with coriander leaves.

To make things spicier, mix red chili powder and a little Pav Bhaji masala along with salt and a few drops of lime juice with the chopped onions. Any one who wants it hotter can add the spiced up onions to the Bhaji!

A New look!

My posts will still be the same but of course with different & new recipes and the look of Taste Buds is definitely different! I was in a mood for a change and so my blog gets renovated to this :)

I had a huge helping hand from dear GM, who is the expert here! Right from picking up the snaps & designing the header to deciding the colour scheme, he was there with his suggestions & ideas.

I hope you will enjoy the new look. Please do let me know if you face any problems accessing the blog or if the page is not getting loaded properly. I would also welcome any suggestions that you might have for me to improve the look or functionality of this blog.

Sunday 24 August 2008

Orange & Oat Bars

MBP_Logo

The original name was Orange & Date bars. I found this simple & quick recipe at Sunita's World and liked it immediately. More so because I had these oats with me for a long time which were waiting to be used somewhere, having left the hope of being consumed as it is, long back!

Since I used lesser amount of dates in the recipe I am calling them Orange & Oat Bars. Except for this small change I followed the exact recipe from Sunita.

20Aug08 236

This is my entry for this month's MBP-Fruit Fare, an event started by Coffee (Spice Cafe) and being hosted by Aparna (My Diverse Kitchen) this month.

Friday 22 August 2008

Batata Vada

This is not the first time I made them. Vada Pav is one of the 2 things that we miss the most here. Pani Puri is the other one. Samosa, we manage to get some decent ones. Even Bhel, Sev Puri, papdi chat etc are available in restaurants and at some places they are really nice. But not these two. The Batata (Potato) vadas available in the restaurants are more Aloo Bonda, not at all the same as the Batata wada you get on the streets of Bombay & Pune.

Wada Pav for me, in Bombay is synonymous with the thela (cart) near King George School in Dadar. And for Pune its the Joshi wadewale. You do get them at all the other places but these two are the best in the respective cities for me! Whenever we are in Pune, we actually make the Rickshaw take a route so that he passes one of the Joshi outlet, stop and have some & pack some more to savour later. King George School Wada Pav is a different story altogether. The two years of Junior College were literally spent enjoying these Wada Pavs and Samosas from a store called Nityanand right next to the college. Strategic locations, I say :)

Whenever we are in the mood for Batata Vada, we make them at home. No use searching for good ones outside. So as I was saying this was not the first time I made these. But this time I made a slight change which resulted in the Wadas being almost the same as those available on the streets. I added Eno Fruit salt to the besan (Chickpea flour) batter and the vadas turned out crisp & delicious. For those who don't know, Eno is a very popular antacid brand in India. Baking Soda can be added as a substitute for this. Although I have never liked the idea of adding soda/Eno to the frying batter, I really wanted to try it out once & see the difference. It definitely makes a difference!

Anita's A Mad Tea Party will be celebrating its Birthday & the menu for the party is Batata Vada!

Serves ???(Never mind. The consumption has no connection with the No of People!)

Instead lets just say the following will make about 11-12 medium sized vadas

Ingredients

For the batter:

  • 2 cups besan (Chickpea flour)
  • 1/2 tsp Turmeric powder
  • 1/2 tsp red chili powder
  • salt
  • 1 tsp Eno fruit salt

For the potato stuffing:

  • 5-6 medium sized potatoes, boiled & peeled
  • 5-6 green chilies
  • 3-4 cloves of garlic
  • 1/4 cup chopped fresh Coriander leaves
  • 1/2 tsp Turmeric Powder
  • Salt

Oil for frying

Method:

Mix together all the ingredients for the batter except Eno Fruit salt and make a thick batter using a little water. The Soda/Eno should be added just before you start frying the vadas.

Grind together the green Chilies & Garlic to make a coarse paste. The quantity of the green chilies can be changed according to how hot the chilies are & also based on how spicy you like your vadas.

Mash the potatoes and add the above paste to it. Also add the turmeric powder, salt, finishing off with chopped Coriander leaves and mix everything properly.Shape into medium sized balls and keep aside.

Heat the oil in a kadai. Once the oil is properly heated, add the soda/Eno to the batter and mix properly.

Dip the potato vadas ion the batter to coat them thoroughly and deep fry them on medium high till they crisp & light brown in colour.

Picture 243

The most ideal way to serve these is with Pav and Garlic Chutney but I had neither and we made do with Tomato Ketchup. The vadas tasted great nevertheless.

These vadas are going to Anita's Mad Tea Party for her second Blogversary, Congratulations! I hope she has a kettle of hot tea ready to go with these Batata vadas :)

Tried & Tasted: Jugalbandi

I first came across Jai & Bee's Jugalbandi when I followed a link for the CLICK event from another blog. As I started browsing post after post, I completely got hooked on to the blog. I am not saying recipe after recipe, purposely, because their posts are so much more than just recipes. Theres loads of information, fantastic photographs, new ideas, healthy options and so on. Every food blogger now knows about their Garden 'patch' which, I am assuming, yields most of their kitchen supplies :)

I always refer to Jugalbandi, when I want to make something with a particular veggie but don't know what exactly to do with it. I had tried Brussels Sprout a few days back as per this(favourite style) and liked it very much. That was my first time with the Sprouts.

Now I had some Asparagus with me and after having tried it this way, I wanted to do something different with it & browsed their blog and found exactly what I was looking for.  So I went ahead and made their Roasted Asparagus, Carrots and Zucchini with herbs.

I followed the exact recipe but also added Broccoli. I used basil, cilantro and just a little bit of Mint for the fresh herbs.

 20Aug08 225

The veggies came out really well but I think I might have cooked them in the oven for a couple of minutes more than required, will have to be more careful next time.

This is my entry for Tried & Tasted event at Zlamushka's Spicy Kitchen.

Wednesday 20 August 2008

Mixed Berries Jam

If it wasn't for blogging I would have just picked up a jar of Mixed fruits Jam from Tesco, instead of the three berries that I did last weekend. Blogging, especially reading other blogs has inspired me to try out a lot of different things which otherwise, though doable, had never crossed my mind. Apart from introducing me to a variety of cuisine, some that I had never known, blogging has increased my knowledge about food and food related things a lot.

So there I was at the counter with the berries among the other things, smiling to myself, thinking that I would actually be attempting to make Jam at home this time. After going through some web sites, I determined the basics and then set out to make it.

This recipe is not from a particular site, mainly because I have a very bad (?) habit of not following any recipe completely. I always read through a recipe only to get an idea about how the thing is made and then go about making it with any improvisation that comes to my mind while making it. Even the quantities are changed while cooking. I tend to go with my instinct about how much of a particular thing will be good for the dish. In a similar manner, for this Jam I added sugar after I had tasted the berries & gauged their tartness instead of following the cup measurements given in the recipes. For the records I made a note of the quantity and that is what I am presenting here.

Makes about 4 cups

Ingredients

  • 5 cups Mixed Berries (I used Blackberry, Raspberry & Blueberry)
  • 2.5-3 cups Sugar (Adjust this according to your taste)

Method:

Take the sugar in a large pan and heat it, covered for 2 minutes. This will warm the sugar making it easier to dissolve. Alternatively, the sugar can also be heated in the microwave and then added to the berries. Take care not to heat the sugar too much.

Once the sugar is a little warm, add the berries and heat on high. Stir the contents while mashing the berries with a potato masher.

Cook on medium high till the mixture starts thickening. Once it reaches a point where its more like gel and flows heavily from an inverted spoon, switch off the heat and allow it to cool. It will thicken further while cooling.

20Aug08 349

Store in a dry, sterilised bottle and cool further.

Conclusion: The Jam turned out great but a little thicker than I wanted it to be. Next time I will have to be careful about when to stop heating it.

This Jam is on its way to Sunshinemom for her Food in Colours event

Thursday 14 August 2008

Paneer Tikka Masala

I don't know why but I remembered Saeed Jaffrey's 'Tandoori Nights' when I sat down to write this post. For those who don't know or dont remember, Tandoori Nights was a serial that was telecast on Doordarshan at least 15 years back (don't remember the exact period), when I was in school. This serial, originally from BBC, was based in London and revolved around Saeed Jaffrey's character who ran an Indian Restaurant in London.

One reason could be that the serial was based in London and I have not seen any other people other than Londoners so fond of the Tikka masala. Of course there preference is the Chicken Tikka, but since I am a vegetarian, Paneer Tikka finds a place in our home & our menu whenever we are at an Indian Restaurant. I didn't have an idea how popular this is with the British here until I was speaking to this gentleman, who happened be GM's manager's brother. The minute we told him that we were from India he went " Aaah India! Goa! Taj Mahal! Elephants! Chicken Tikka!!! Incidentally are these the only things that India has to boast of?

Another reason could be the association with 'Tandoor' which is where the Naans are traditionally made. And Paneer Tikka Masala tastes best with these Naans. Incidentally the Tandoor also reminds me of 'Sanjha Chulha' a serial which used to be telecast on Doorarshan long back. Didn't we see a very young looking Shahrukh Khan in it? Apart from his 'Fauji' of course. And why am I getting so nostalgic about old Doordarshan serials all of a sudden!

But getting back to the real topic I also remember that when I was old enough to understand menu cards and had come across this dish, I thought that this must be Paneer Tikha (Hot & Spicy) Masala and the colour of the gravy served like a confirmation. It was only much later that I came to know about the 'Tikka' and have been a fan of this dish since then. In restaurants they use Tandoori colour which gives the Paneer as well the gravy that orangeish kind of red colour.


Ingredients
For the Paneer tikkas

  • 2-3 cups Paneer cubes
  • 1 cup diced onion, tomato & Capsicum
  • 1 tsp Red Chili powder
  • 1 tsp Garam Masala Powder
  • 1-2 tsps Ginger garlic Paste
  • 1/2 tsp Haldi (Turmeric)
  • 1 cup beaten Curd
  • Salt

For the gravy

  • 3 Tomatoes
  • 3 Onions
  • 2-3 tsps Khuskhus (Poppy Seeds)
  • 3-4 Cloves
  • 1" of cinnamon
  • 2-3 Cardamoms
  • 2-3 tblsp Cashewnut
  • 2 tsps Kasuri methi
  • 1-2 tsps Red Chili powder
  • 1/2 tsp Turmeric powder
  • 1 -2 tsps Coriander powder
  • 1 tsp Cumin powder
  • 1 tsp Sugar
  • 2 tblsp Oil
  • Fresh Cream
  • Salt

Method:

For the Paneer Tikka: Mix together all the spices & ginger-garlic paste with the curd and add the paneer pieces & the diced vegetables to coat them well. Keep aside for at least an hour.

Heat oil in a pan and shallow fry the paneer pieces until they turn golden brown. Alternatively this can also be done in the oven by roasting the paneer at 200 deg C for approx 20 min. The oven option is obviously a healthier one. Repeat with the onion, tomato & capsicum without cooking them too much.

For the Gravy: Grind the onions to a paste. Grind together the khuskhus & cashewnuts and make a paste. Blanch the tomatoes and puree them. Mix all the spice powders except for the kasuri methi with a little water to make a paste. This is done so that the spices dont get burned when added to the heated oil.

While the preparations might sound quite elaborate, the end result is worth every effort, trust me :)

Heat oil in a pan. Add the sugar and stir. The sugar will slowly caramelise and the oil will get a rich golden brown colour. At this point add the cloves, cinnamon and cardamom and fry them till you get a nice aroma.

Add the onion paste and fry well. Add the masala paste and mix well and fry for a minute. Then put in the Cashew-Poppy paste and fry.

Add the kasuri methi and then the tomato puree and cook till the gravy gets a little dry & oil starts separating from the sides.

Add the Paneer Tikka, onion, tomato, capsicum and salt and mix well. Cook for 5 more minutes and then add the cream and turn off the flame. If you want a thinner gravy add more cream but not water.

2008_0421fuji0034

As mentioned earlier, this pairs best with Tandoori Naans. In their absence, serve it with rotis/phulkas/parathas.

Pooja of My Creative Ideas is hosting an event, Theme of Week, on the occasion of Independence Day, where the entries have to relate to the Indian Tri Colour. I happened to click the diced veggies which I am sending to this event.

2008_0421fuji0020

What an irony! I am celebrating the Indian Independence with a post about an Indian Dish, most popular among the British, from whom we got the Independence in the first place! :)

HAPPY INDEPENDENCE DAY!

Friday 8 August 2008

Roasted Asparagus & Broccoli with Garlic & Basil

We have a love-hate relationship with the 'healthy' veggies. The ones that I love, GM doesn't and vice versa. So to avoid each other's disliking, we avoid making these veggies altogether. Some examples being Brussels Sprouts, which I like but GM is not fond of. Another was Asparagus, which was favoured by GM but I avoided it. I say was because after trying it with the Garlic-Basil combination, I have warmed up to this healthy shoot.

As for Broccoli, we had never actually tried making it at home. So we thought of giving it a try and paired it up with the Asparagus.

Serves 2 (as a side)

Ingredients

  • 12-15 Asparagus tips
  • 8-10 florets of Broccoli
  • 1 tblsp Olive oil
  • 2 cloves of Garlic, minced
  • 6-8 Basil leaves, finely chopped
  • Salt & Black pepper powder

Method:

Pre heat the oven to 200 deg C.

Discard the hard & stalky portion of the Asparagus and wash them thoroughly. Watch this for a detailed explanation.

Greens

Take the asparagus tips and Broccoli florets in a bowl. Add the olive oil, garlic and basil. Season with salt & pepper and mix thoroughly.

Arrange the asparagus shoots & the broccoli on an oven tray without crowding them too much.

Place the oven tray in the pre heated oven and roast for 15-20 min or until the tips start browning. Both the Asparagus & Broccoli turn a bright green shade once cooked. Remove and serve hot.

5Aug08 061

The addition of Garlic & Basil did wonders to the Asparagus, which I had thought to be a little bland the last time I had it. And for a change, both of us liked the Broccoli, no two ways about that.

I am sending this to Dee's Herb Mania, basil being the chosen one this month.

Tuesday 5 August 2008

Saffron & Cardomom Panna Cotta

Update on 6th Aug: Zlamushka has agreed to accept this for the event as the entries have not yet been compiled. So this post is going to Tried & Tasted after all :)


I got everything ready to make the Panna Cotta. Heavy cream (Extra double, it says!), the gelatin (my first time with this wonder ingredient), the spices (lovely combination) and so on. But most importantly the recipe, from none other than the 'Queen of Desserts' herself - Meeta (What's for lunch Honey)!

With everything done, the ramekins safely put away in the refrigerator, I sat down to write this post and thought of confirming the deadline for Tried & Tasted, where What's for lunch honey, 'is' the featured blog.

One look at Zlamushka's Spicy Kitchen and I felt as if I had studied for Mathematics and on reaching the Examination hall, discovered that the today's subject was Science! The deadline had already passed me by and in my enthusiasm to get all the things in place before I thought of making the dish, I had missed the event altogether!

Jugalbandi is the featured blog for this month now, and I am going to make sure that this time I don't repeat the mistake.

As for the Panna Cotta, I followed Meeta's recipe exactly as it is, just like an obedient student and was rewarded with a rich, delicious dessert. Read the original recipe here.

Makes about 5 small ramekins.

Ingredients

  • 3 1/4 Double Cream
  • 1/2 cup sugar
  • a pinch of salt
  • 1 cup of milk
  • 2 1/2 teaspoons gelatin
  • 5 Cardamom pods
  • some strands of saffron
  • Coarsely chopped almonds for garnish

Method:

Combine the  cream, sugar & salt in a saucepan and heat the mixture without boiling it. Turn off the heat and add the cardamom & saffron and keep aside for approx 25-30 min for the flavours to infuse in.

Sprinkle the gelatin in the milk and keep aside for about 10 minutes for the gelatin to soften, without stirring it.

Add the gelatin mixture to the cream and heat again. Keep stirring to dissolve the gelatin. The mixture has to be heated but not boiled.

Take some ice & water in a bigger bowl and keep a smaller bowl immersed in this. Strain the Cream into this small bowl. Keep stirring until the mixture cools and thickens.

Pour into ramekins, cover with cling film and refrigerate for at least 10-12 hours.

5Aug08 102

I served them as it is in the ramekins, sprinkled with almonds and some saffron strands.

This was the first time I attempted a Panna Cotta and we absolutely loved it. This is going to be a regular dessert for us now onwards, keeping in mind of course the calories it carries! Thank you Meeta for this recipe.

This Panna Cotta is on its way to DK (Culinary Bazaar) for her A.W.E.D.-Italiano event