Showing posts with label Baby corn. Show all posts

Friday, 4 December 2009

Hot, Sweet & Sour Veg Soup

The weather is getting colder by the day, which itself is getting shorter and shorter. It starts getting dark by 3.30-4 in the afternoon and it does feel a little odd in the beginning. But as time passes we will get used to it & in fact I am sure it will feel odd when the day starts to stretch after March-April!

When its cold & dark, you feel like having something hot & spicy, at least I do :) I have a weakness for anything that has Garlic & Soy Sauce as its main ingredient. Of course for me this mainly means what is popularly known as the Indo-Chinese cuisine. This soup is as good as it gets. Full of flavour & healthy veggies. Perfect for me when I ‘think’ I am on a diet.

Hot, Sweet & Sour Vegetable Soup

Picture 008

Serves 2

Ingredients

  • 2 medium sized carrots, chopped
  • 5-6 Baby Corns, cut into rounds
  • 1 Green Pepper, chopped
  • 1/2 French/Fine beans, chopped
  • 4-5 Asparagus tips, chopped
  • 1 small onion, chopped
  • 2 cloves of garlic, minced
  • 1/2 tsp grated ginger
  • 1/4 tsp Green chilli paste (optional)
  • 500 ml Vegetable stock (or water)
  • 1 tblsp oil
  • 1-2 tsp Soy Sauce
  • 1-2 tsp White Vinegar
  • 2-3 tsp Corn Flour
  • 1 tsp Sugar
  • Salt & Pepper

Method:

Boil the Asparagus tips till they turn bright green, approx 2 min. Drain and set aside.

Heat the oil in a deep pan. Add the onions, ginger & garlic and sauté. Add the chilli paste if using and fry for 2 more minutes till the onions turn soft.

Add the  carrots, beans, baby corn and mix well. Put in the soy sauce, a little salt (keeping in mind that the soy sauce is salty too), pepper powder and the sugar.  Mix and cook for another minute.

Add the stock and bring it to a boil. Add the pepper and vinegar, mix and simmer till the vegetables are cooked, aprrox 10-15 minutes.

You can get this soup ready till this point and go ahead with the following steps when you are ready to serve.

Dissolve the corn flour in a little bit of water and add it to the soup to thicken it. Also add the boiled asparagus now, stir and cook till the soup reaches the desired consistency. Serve piping hot!

Picture 010

My Notes: It was delicious, full of flavour and completely filling. Give me a bowl of this hot soup and a mystery novel to read or an Agatha Christie’s Poirot movie and I am set for the evening!

Looks like Meeta’s Monthly Mingle is celebrating Soups at the right time, over at Tongue Ticklers this month!

Thursday, 30 July 2009

Chinese Style Vegetable Stir fry

We always knew it, but the weighing scale brought us out of our optimistic thinking that the weight gain was temporary. On Sunday we realised that it was for real, was here to stay and in fact threatened to increase with time. It was high time we did something about it. And obviously food was the prime suspect. There were others like complete inactivity during the weekends, an almost wasted gym membership etc, but it was easy & convenient for us to put the blame on the food we consume & so we decided to change it, at least one meal of the day.

Now, we are not doing anything drastic not even following any particular diet. Although I have to say, inspired by Sig, I did a lot of reading up on the South Beach diet and other Low carb ones. I even tried to follow the SBD for some time but could not keep up with it. I find it a bit difficult to completely follow such diets being a vegetarian. There are a lot of Carb less options for the Non Vegetarians but for me it was very tough thinking up low carb meals without using Meat, Sea food, Eggs & even Mushrooms (I have an allergy!).

So currently we are replacing our usual dinner meal for something more healthy, low fat & low carb and combining this with a mandatory 30 min workout everyday. We are also limiting the consumption of bread for breakfast and fried items & sweets are prohibited unless absolutely necessary on days when there has to be a Naivedya. Believe me its an uphill task to start a diet in the month of Shravan!

I don't think I will be able to write daily about this ‘diet’, but will try to update with the dinners we had, as frequently as possible. And success, if any, will be conveyed with bold letters!

Chinese style Vegetable stir fry

Picture 306

Ingredients

  • 2 Carrots
  • 5-6 Baby Corns
  • 1 Green pepper, sliced
  • 1 Cup small florets of Cauliflower
  • 1 cup Peas
  • 1.5 Cups of Paneer Cubes
  • 1/2 tsp oil
  • 2 cloves of Garlic, minced
  • 1 tsp ginger, chopped finely
  • 1 Green Chilli, slit lengthwise
  • 1 tsp Soy Sauce
  • 1/2 tsp White Vinegar
  • 1 tblsp Tomato Ketchup (Optional)
  • Salt & Pepper

Method: Peel and cut the carrots into medium sized pieces. Cut the baby corns into equal sized discs. Boil these along with the cauliflower florets for about 3-4 min. The veggies should have a crunch to them but be cooked.

Put a Wok on to heat. When hot, add the paneer cubes and stir fry on high flame till the sides are browned. Remove and keep aside.

Add the oil or use an oil spray.

Put in the garlic, ginger and the green chilli & sauté for a min. Add the boiled veggies and sauté on high flame for about 3-4 min till the edges start browning.

Next, add in the sliced pepper and continue to stir fry. Add the peas, soy sauce, vinegar, salt & pepper and sauté on high flame.

Add the ketchup if using and mix. Lastly add in the paneer and mix till well coated. If at this point you fell that the veggies are dying up, add 1-2 tblsp of water and keep cooking on high flame for another min or so.

Picture 312

We both had a bowl each of this delicious stir fry and actually enjoyed the fact that we are on a diet! If diet food can taste like this then I am all game for it!

Sunday, 1 March 2009

Roasted Red Pepper & Baby Corn Lasagne

I had made Lasagne for the first time around 3 yrs back, following a recipe from Tarla Dalal. I get these set of recipes emailed to me every week since I registered on the official website. This particular Lasagne recipe sounded simple enough and even included the steps for making the Lasagne sheets and that seemed quite easy too. But I had never had lasagne before so when the recipe asked the pasta dough to be cut into strips I actually cut them into thin ones, just like Fettuccine (As you can see my knowledge of pasta has improved a lot since then!). Well, the recipe did say 'Strips' so strips were what I made and dropped them in the sauce and the whole thing then went into the baking dish along with lots of cheese. The end result was tasty nevertheless and till date whenever I make 'that' lasagne, even though I know they are supposed to be sheets, I still cut the dough into strips.

But that is not the recipe being presented here. I Just wanted to add some veggies along with the sauce and instead of adding them as is, I roasted them a bit. The choice of veggies was also not thought upon. I always have baby corn in the fridge and peppers too, this time it happened to be a red one. But the combination turned out to be a very good one.

And this one uses 'real' Lasagne sheets, store bought. The pack mentioned that pre cooking was not required so I used them straight out of the pack. But next time I might boil them for a couple of minutes before assembling the lasagne. The thing with these sheets is that if your sauce has enough liquid content in it & the sheets are well covered with it during baking, they get cooked well. In my case I felt that it should have been cooked just a little more.

Serves 2

Ingredients

  • 1 Red Bell pepper, diced
  • 5-6 Baby Corns, Cut lengthwise
  • Olive Oil
  • Salt & pepper

For the Tomato Sauce

  • 1 tblsp Olive oil
  • 2 cloves Garlic, finely chopped
  • 1 small onion, finely chopped
  • 1 Jalapeno Chilli, chopped
  • 2 tomatoes, chopped
  • 1 cup Tomato Passat (Sieved Tomato paste)
  • 2-3 tsp Mixed dried herbs
  • 1/2-1 tsp Red Chilli powder
  • Salt

For the white sauce (Béchamel Sauce)

  • 2 tblsp Butter
  • 2 tblsp Plain flour
  • About 2 cups of milk
  • Salt & Pepper

6 Lasagne sheets

1 Cup Grated cheese (I used Double Gloucester, since thats what I had. You can also use Mozzarella or Cheddar)

Crushed Red Chilli Flakes

Method:

Pre heat the oven to 200 deg C on broiler setting. Arrange the baby corn & Red Pepper on a baking sheet.

Picture 001

Drizzle with Olive oil and sprinkle salt and pepper powder. Mix and place in the oven for about 10-15 min or till the edges are brown & crisp. Keep aside until required.

For the Tomato sauce, heat a pan with the Olive oil. Add the garlic & onion and saute till the onion turns translucent. Add the Chilli and chopped tomatoes. Cook till the tomatoes are mashed properly.

Picture 0141

At this point add the tomato paste, dried herbs, salt and red chilli powder. Mix well, cover and cook for about 10-12 minutes. Switch off when the sauce achieves a paste like consistency.

For the white sauce, Heat a non stick saucepan and melt the butter in it. Add the flour little by little and keep stirring for the flour to be properly mixed with the melted butter.

Remove the pan from the heat and add 1/2 cup of milk, whisking at the same time for the milk & flour-butter mixture to be mixed without forming any lumps. If you think the quantity of milk is not enough add some more out of the remaining milk. Once everything is mixed properly, return the pan to heat and add the remaining milk little by little, whisking as you do so.

Heat this mixture on a medium flame and the sauce will begin to thicken.

Picture 013

Once the sauce is thick enough but of pouring consistency, switch off the flame and season with salt & pepper.

To assemble, lightly grease a baking dish and spoon in 1/4 of the tomato sauce. Place 2 lasagne sheets on this. Top this with another 1/4 of the Tomato Sauce. Arrange 1/3 of the roasted veggies and top them with 1/3 of the cheese.

Now place 2 more lasagne sheets on the cheese and again add 1/4 of Tomato Sauce, 1/3 of the veggies and 1/3 of the cheese. Repeat once more, reserving some of the remaining cheese.

Top this with the White sauce to coat evenly. Sprinkle with the reserved cheese & the chilli flakes and bake at 200 deg C for 20-25 min or until the sauce begins to bubble and the cheese starts browning.

Just before going into the oven:

Picture 019

All done & ready to be served

Picture 021

This picture of the is my entry for this month's Click, the theme is Cheese/Tofu.

And Served hot:

Picture 0351

Note: Its better to make the white sauce just before you start assembling the Lasagne as it will start to thicken even more when it is cooled.

The classic White sauce recipe asks for nutmeg powder to be added along with the salt & pepper, I don't like the nutmeg flavour too much so I have skipped that. You can also add grated cheese to the sauce to make it richer.

Some Lasagne recipes ask for the white sauce to be added between the layers as well but I have avoided that as we like the taste of tomato sauce to be dominant.

Thursday, 23 October 2008

Fried Rice with Baby Corn Manchurian

My association with Chinese food, or rather what is popularly called the Indo-Chinese food can be best described by saying that I absolutely can not survive without it. And the one time that I was forced to live without it, was like a nightmare for me to say the least. But more about it later.

Authentic Chinese is no where close to what we get in Indian restaurants under the name of Chinese cuisine. The real Chinese food is a lot less spicier and even most of the vegetables etc used in the Indian restaurants never feature in Chinese food, examples being Cauliflower, Paneer (Cottage Cheese) etc. You even get to see peas, Jeera (Cumin seeds), Coriander leaves, Curry leaves etc in some of the restaurants! While I don't want to have curry leaves in my chinese food (!) I also don't prefer the actual blander version of chinese food.

Chinese food also features prominently in my memories whenever I think of my college days & my close friends, my best friend SS in particular. Both of us were crazily into Chinese food. We didn't have to think at all when placing an order in any restaurant. It would invariably be Chinese. Even after passing out of college whenever we met after work, most of the time it used to be Chinese for us.

But all this was put on hold when I developed an allergy to Chinese food, it might have been the soy sauce or one of the other ingredients actually. I never found out what it was but whenever I ate chinese food, I would get nauseated and spend that & the next day vomiting my lungs out! This proved be a very difficult time for both of us. I couldn't have chinese even though I wanted to and because of this even SS couldn't have it. We would reluctantly settle on Pav Bhaji and miss the Hakka Noodles & Manchurian terribly.

The day I discovered that my allergy was gone was one of the happiest days of my life. SS always asked me to see if the allergy was gone. 'If you wont try, how will you know', she would say. But I always put it off, thinking about the bad time I would have. But that day the craving was so bad that I decided to take a chance and was glad that I did!

As with so many other things, I miss the Indian style Chinese food here in London, and have to make it at home if we want it. Only recently I have discovered that 'Tulsi' restaurant in Wembley serves 'authentic' 'Indian style Chinese' ! Their Hakka Noodles is a must try!

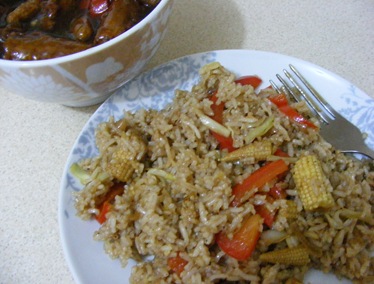
Veg Fried Rice

5Aug08 097
Serves 2

Ingredients

2 cups rice, preferably the Basmati variety
2 tsps Garlic, chopped finely or minced
1 tsp Ginger, finely chopped
2 Green Chillies, slit (Optional)
2 tblsp Soy Sauce
1 tblsp White Vinegar
2 Cups sliced/shredded Vegetables (Capsicum, Carrot, Cabbage)
2 tblsp Oil
Salt
Pepper Powder
Method:

Cook the rice such that the grains are separated. To do this, I add a little less water than usual and 2 drops of oil while I pressure cook it. Once cooked, spread out the rice to cool down.

In a wok, heat the oil and fry the ginger & garlic. Add the Green Chillies and saute.

Throw in the vegetables and saute on high flame. I some times add Baby corn to the rice as well.

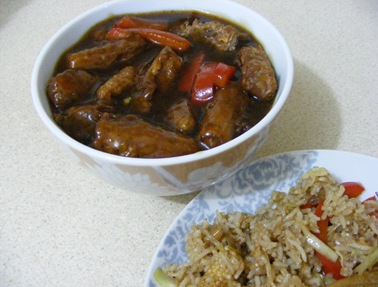
Add the soy sauce, vinegar, salt and pepper and mix thoroughly. Now add the cooked rice and keep mixing on high heat. Adjust the seasoning and serve hot, with Baby Corn Manchurian.

Baby Corn Manchurian

5Aug08 099

Serves 2

Ingredients

For the dumplings

  • 8-10 Baby Corns, cut into bite size pieces
  • 4 tblsp Maida (Plain Flour)
  • 2 tblsp Cornflour
  • 1/2 tsp Ginger paste
  • 1/2 tsp Garlic paste
  • 1 tsp Soy Sauce

For the gravy

  • 1/2 cup Sliced vegetables such as spring onion, capsicum (optional)
  • 2 tsp minced Garlic
  • 2 tsp grated ginger
  • 2 tblsp Soy Sauce
  • 1 tblsp White Vinegar
  • 2/3 tblsp Cornflour
  • salt
  • Pepper


Oil for frying and for the gravy

Method:

Prepare a thick batter with the Maida, corn flour, ginger & garlic pastes, Soy sauce, salt, pepper powder and water.

Heat oil in kadai. Dip the baby corn pieces into the prepared batter and fry till crisp. Remove on kitchen towel and reserve.

Heat 1 tblsp oil in a wok. Add the ginger and garlic and fry for half a minute. Add the sliced vegetables if using and saute on high flame. Add the soy sauce & vinegar and cook on high flame.

Add 1/2 cup of water, salt & pepper and bring to boil. Dissolve 2/3 tblsp of corn flour in a little cold water and add this to the Manchurian.

Heat while continuously stirring as the gravy thickens. Cook till it reaches the desired consistency and then add the fried Baby Corn. Mix properly and switch off the heat. Garnish with Spring Onion greens and serve hot.

To make this into a dry Manchurian, reduce the quantity of water to around 2-3 tblsp and the corn flour to just 1 tblsp.