Showing posts with label Peas. Show all posts

Tuesday, 11 May 2010

Simple Cabbage stir fry Bhaji

How long do you spend planning the menu each day? Breakfast, Lunch, Dinner – do they dominate your thoughts throughout the day? Are you constantly thinking about how to use up the stuff lying in the fridge & how best to make use of them?

Please say yes to all the questions above & tell me that you too spend a lot of time thinking & planning the menu. It will rid me of the concern that I am overly obsessed with thinking about what to make for each meal. I sometimes think that I spend way more time making up my mind than actually cooking because once I have decided, its usually a breeze.

I might have exaggerated a bit there, its not the only thought going on but I do tend to be like that on some days. On one such day when I couldnt readily make anything ‘new’, I picked up the cabbage and made this simple stir fry which I have been making all the time, realising at the same time that I haven't blogged about it as well. You do tend to take such simple things for granted, dont you?

This is as simple as it can get and there is no exact science involved except that you have to get the quantity of salt right! This might be a good one to start with if you have never cooked a proper Bhaji before.

Cabbage Stir Fry Bhaji


Picture 01411

Serves 2


Ingredients

2 cups shredded cabbage (coarsely chopped will do!)
1 Small Potato, cut into small cubes (optional)
1/2 cup Peas (optional)


2 Green Chillies, Chopped (adjust acc to taste)
1/2 tblsp Oil


4-6 Curry Leaves
1/4 tsp Mustard seeds
a Pinch of Hing (Asafoetida)
1/4 tsp Turmeric Powder
1-2 tblsp Grated coconut (Optional)


1 tblsp Chopped fresh Coriander
1/2 tsp Sugar (Optional)


Salt

Method:
Heat the oil in a pan, when hot add the mustard seeds.

As they begin to splutter add the curry leaves, Hing, chillies & Turmeric Powder.

Next add the potatoes & fry for a minute. Add the cabbage and sauté.

Cover and cook for about 5 minutes. Add the Peas, salt and grated coconut. Cook covered till the cabbage & potato are completely cooked.

Add the chopped coriander, mix well, cover & cook for just another minute before turning off the flame.

Serve hot with Chapati or as a side dish with rice.

My Notes: This is my favourite way of having cabbage, a vegetable that is hated sometimes because of the strong smell. But the combination with potatoes & peas works very well although you can make the same bhaji using only cabbage.

If you do have a problem with the smell, the fresh coriander added at the last minute will solve it for you, making it aromatic.

Thursday, 30 July 2009

Chinese Style Vegetable Stir fry

We always knew it, but the weighing scale brought us out of our optimistic thinking that the weight gain was temporary. On Sunday we realised that it was for real, was here to stay and in fact threatened to increase with time. It was high time we did something about it. And obviously food was the prime suspect. There were others like complete inactivity during the weekends, an almost wasted gym membership etc, but it was easy & convenient for us to put the blame on the food we consume & so we decided to change it, at least one meal of the day.

Now, we are not doing anything drastic not even following any particular diet. Although I have to say, inspired by Sig, I did a lot of reading up on the South Beach diet and other Low carb ones. I even tried to follow the SBD for some time but could not keep up with it. I find it a bit difficult to completely follow such diets being a vegetarian. There are a lot of Carb less options for the Non Vegetarians but for me it was very tough thinking up low carb meals without using Meat, Sea food, Eggs & even Mushrooms (I have an allergy!).

So currently we are replacing our usual dinner meal for something more healthy, low fat & low carb and combining this with a mandatory 30 min workout everyday. We are also limiting the consumption of bread for breakfast and fried items & sweets are prohibited unless absolutely necessary on days when there has to be a Naivedya. Believe me its an uphill task to start a diet in the month of Shravan!

I don't think I will be able to write daily about this ‘diet’, but will try to update with the dinners we had, as frequently as possible. And success, if any, will be conveyed with bold letters!

Chinese style Vegetable stir fry

Picture 306

Ingredients

  • 2 Carrots
  • 5-6 Baby Corns
  • 1 Green pepper, sliced
  • 1 Cup small florets of Cauliflower
  • 1 cup Peas
  • 1.5 Cups of Paneer Cubes
  • 1/2 tsp oil
  • 2 cloves of Garlic, minced
  • 1 tsp ginger, chopped finely
  • 1 Green Chilli, slit lengthwise
  • 1 tsp Soy Sauce
  • 1/2 tsp White Vinegar
  • 1 tblsp Tomato Ketchup (Optional)
  • Salt & Pepper

Method: Peel and cut the carrots into medium sized pieces. Cut the baby corns into equal sized discs. Boil these along with the cauliflower florets for about 3-4 min. The veggies should have a crunch to them but be cooked.

Put a Wok on to heat. When hot, add the paneer cubes and stir fry on high flame till the sides are browned. Remove and keep aside.

Add the oil or use an oil spray.

Put in the garlic, ginger and the green chilli & sauté for a min. Add the boiled veggies and sauté on high flame for about 3-4 min till the edges start browning.

Next, add in the sliced pepper and continue to stir fry. Add the peas, soy sauce, vinegar, salt & pepper and sauté on high flame.

Add the ketchup if using and mix. Lastly add in the paneer and mix till well coated. If at this point you fell that the veggies are dying up, add 1-2 tblsp of water and keep cooking on high flame for another min or so.

Picture 312

We both had a bowl each of this delicious stir fry and actually enjoyed the fact that we are on a diet! If diet food can taste like this then I am all game for it!

Tuesday, 16 September 2008

Methi Matar Malai

I consider myself very lucky because I get almost all the Indian supplies in this part of London where I live. I have some friends staying in other areas who are actually envious of me because of this. Grocery items such as the wheat flour, spices and some special items like Pohe (beaten rice), Rawa (Semolina), Murmura (Puffed rice), tamarind, Jaggery - you name it & I get it here at the local Tesco store.

For those who don't have easy access to these things, it is possible to hunt for these items & store them for a long time, say a month or until they again go to that particular store. What makes the real difference is getting the vegetables such as Drumstick, curry leaves, Gawar (cluster beans), Methi (Fenugreek), small brinjals, Kairi (raw mangoes), Dudhi (bottlegourd), Bittergourds etc.

Even though I get these veggies easily here, there are times when you don't see a particular vegetable in the shops for a long time. For this reason, whenever I do get them I stock up on them as if we are never going to get it again :) But even while I am paying for them at the store, the only thought running through the mind is how to utilise them before they get spoilt & wasted, especially the green leafy vegetables, which have a short life span in the refrigerator.

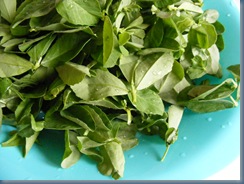
Picture 002

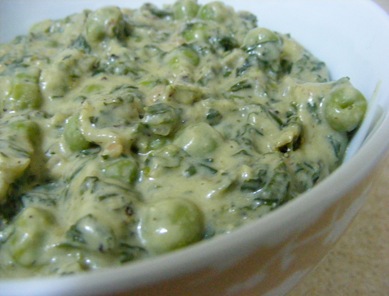
Last week when I saw these very fresh looking Methi (Fenugreek) bunches, I immediately picked up a couple of big ones. One was used to make these Thepla style Paranthas. The other was awaiting its turn in the refrigerator all plucked & cleaned up when it struck me that it had been a really long time since we had had Methi Matar Malai, a rich creamy preparation of Fenugreek & Peas.

Serves 2-3

Ingredients

  • 3 cups chopped Methi (Fenugreek)
  • 1 cup Green Peas
  • 1 onion, chopped
  • 2 Tomatoes
  • 1 tsp Sugar
  • 1 tblsp oil
  • 2 tsps Cumin Seeds
  • 1/2 cup milk

To be ground into a paste

  • 1 onion
  • 2 Green Chillies
  • 1" piece of Ginger
  • 2 cloves of garlic
  • 3 tblsp Cashew
  • 2 tsp khus khus (Poppy seeds)

For the dry masala powder

  • 2" Cinnamon stick
  • 2-3 cloves
  • 2 cardamoms
  • 3-4 peppercorns
  • 1 tsp cumin seeds

Method:

Heat 1/2 tblsp oil in a pan and add 1 tsp cumin seeds. When they crackle add the chopped Methi leaves and saute for 3-4 minutes. Remove from fire and reserve. The original recipe actually called for the methi leaves to be mixed with 1-2 tsp salt & kept for 15 minutes, the leaves are then to be squeezed to get rid of the water. This is done to reduce the bitterness of the Methi leaves. I always skip this part because I like the slight bitter taste and also since the methi leaves available here are not that bitter anyway!

Blanch the tomatoes, peel, puree and keep aside.

Dry roast all the ingredients for the dry Masala and grind them to get a powder. Alternatively you can crush them in a mortar but the result will not be a fine powder.

To make the wet paste of onion & other ingredients, first dry grind the cashew and then add the other items and a bit of water if required, to get a smooth paste.

Heat the remaining 1/2 tblsp oil. Add the chopped onion & fry till they turn golden brown. Add the onion-cashew paste and fry for some more time. Add the dry masala and the tomato puree and cook for about 5 minutes.

Add the peas, methi, milk, sugar and salt, mix and cook for 10-12 minutes.

Add the cream and turn off the flame. Mix well.

Picture 179

Serve hot with Roti, Phulkas, chapatis or Naans.

This is one of the few sweet tasting (very slightly!) curry/bhaji that we like, otherwise sweet gravies are a strict no-no for us. The combination of sweet & spicy is the main flavour of this dish.

Friday, 29 August 2008

Pav Bhaji with home made Pav from Jugalbandi

Pav Bhaji is a regular with us for many reasons. First & foremost because we love it so much! Then, the simplicity of the recipe and a feeling of having had something special for lunch/dinner :)

GM makes great tasting Bhaji and I have still not been able to match that although I follow the same recipe and both of us use the same Masala powder! But he is too modest to admit that and prefers that I make the bhaji every time. And no he is not trying to escape the working in kitchen because when we make Pav Bhaji he is the one who chops the vegetables and gets everything ready most of the time :)

So, while we get to eat the almost authentic Bombay restaurant style Bhaji, what we miss, or rather used to miss is the Pav. We get a lot of different breads here, soft buns, burger buns, rolls, baguettes and so many more but not the real Ladi Pav which, if you ask me, is a must for that authentic feel to Pav Bhaji.

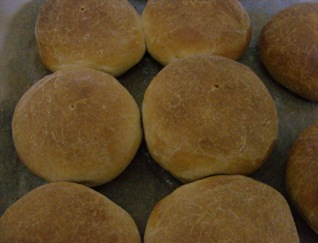
Imagine my reaction when I saw the recipe for these Pav along with a host of information about the same and the very necessary Amul Butter at Jugalbandi! I was happy and apprehensive at the same time. Finally there was a possibility that we could have real Pav with the bhaji now, but I was apprehensive because I had never tried my hand with Yeast baking before, meaning I had never ever made bread at home. But on seeing the easy recipe was totally tempted to try it.

So on Friday, we had Pav Bhaji with the real Pav! But as always I was so excited & in a hurry to try them out that I misinterpreted one step and applied the butter on the surface much earlier than was required, the result being that the outer crust of the Pav turned out to be a little crispier.

Now, Jai & Bee, as always have given the healthier option of using whole wheat, but since I wanted the 'authentic' Pav and was ready to forego the health part, I used Maida (Plain flour) instead.

20Aug08 427

I am sending this to Zlamushka for the Tried & tasted event, where Jugalbandi is the featured blog of the month.

Recipe for the Bhaji

Ingredients

  • 4-5 medium sized Potatoes
  • 1 small Green Capsicum
  • 1/2 cup Green peas
  • 5-6 florets of Cauliflower
  • 1 medium sized onion, finely chopped
  • 3 medium sized tomatoes
  • 2-3 cloves of garlic
  • 2-3 Green chilies
  • 3 tsps Pav Bhaji Masala
  • 1-2 tsp Red Chili Powder
  • 3-4 tsps Fresh Coriander leaves, chopped
  • 2 tblsp butter for the Bhaji and lots more for the Pav
  • Salt
  • Finely chopped onions, lemon slices & fresh coriander

Method:

Boil the potatoes, peel, mash & keep aside.

Boil the other vegetables as well - peas, cauliflower, capsicum in this case. You can use a lot of other vegetables but we prefer to keep it simple and use only the above mentioned, cauliflower also getting axed sometimes. Once they are boiled, mash these too and keep aside.

Grind together the green chilies and the garlic to make a paste.

Heat the butter in a pan and fry the onions. Continue to fry till the onions start turning brown. At this point add the chilies-garlic paste and fry for some more time(abt 3 min). The bhaji gets a lovely colour because of the browning of the onions.

Add in the chopped tomatoes and cook till they are tender.

Add the Pav Bhaji Masala, red chili powder and salt and saute. Once the spices are mixed thoroughly add the mashed potatoes and mix.

Add the other mashed vegetables and mix and cook on medium flame.

If the bhaji is very dry add a little water to thin it out, as little as possible. Adding too much water will spoil the consistency of the bhaji and also affect the restaurant style taste. In fact the bhaji made in restaurants does not have any water at all and the semi solid consistency is obtained by adding huge amounts of butter to the bhaji while mashing it on a large Tawa (Griddle). Since this is practically not possible at home, I add a little bit of water.

Add the chopped coriander leaves and give it a stir and let it heat for another 5 min before turning off the flame.

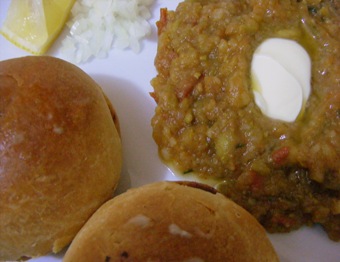
To serve, slit the Pav into halves and roast them on a griddle with lots of butter. You cant get stingy with the butter here, its a must!

20Aug08 436

Serve the Bhaji with a dollop of butter along with the Pav, chopped onions, lime slices and garnished with coriander leaves.

To make things spicier, mix red chili powder and a little Pav Bhaji masala along with salt and a few drops of lime juice with the chopped onions. Any one who wants it hotter can add the spiced up onions to the Bhaji!

Tuesday, 18 March 2008

Gajar Matar ki Sabzi

What do you do when you don't have any vegetables readily available with you and you are not in the mood to have chole, rajma, moong or other such things? Let me tell you what I do. I make Gajar Matar ki sabzi. For some reasons I always have carrots in my kitchen. Not that I get it & then don't use it and it keeps lying in the refrigerator. On the contrary we use it almost everyday as a salad and also sometimes in my 9 months old daughter's meal in the form of puree. So Carrots are always on the list when I go for my weekly veg/grocery shopping. Also frozen peas are always stocked in the freezer. So many times this is on the menu on a Friday evening when I am out of all the veggies and nothing special is planned for dinner.


Serves 2

Ingredients
2 carrots washed, peeled & cut into small pieces
One large bowl peas
1 tsp jeera (cumin seeds)
1 pinch of hing (asafoetida)
1/2 tsp haldi (turmeric powder)
1 medium sized tomato, chopped
1 tsp chili powder
2 tsp dhaniya jeera powder (coriander & cumin powder)
1/2 tsp garam masala powder
Salt
Chopped Coriander leaves

Method:

Heat oil in a pan and add the jeera. When it changes colour put hing & haldi. Add the carrot & saute for a few min. Add the peas and cook on medium heat for about 3-5 min.


(The colours were looking so vibrant that I could not resist taking this snap. I only wish we could get those red carrots here that we get in India)


Add the chopped tomatoes & mix. Now add the salt, chili powder, dhaniya jeera powder & Garam Masala powder & mix properly. Cook for 2-3 min.

Add enough water to immerse the carrot & peas. Cover & cook till the carrots are tender. Add the coriander leaves & mix.

Now simmer & cook without the cover till the water evaporates. Garnish with some more coriander leaves.