Showing posts with label Tomatoes. Show all posts

Thursday, 15 September 2011

Tomato Onion Bonda

As expected I am back on a Wednesday for the Blog Hop of course. This time however I nearly missed the train.

We are slowly coming out of the Holiday mood and settling in the school routine. Although we had everything arranged and ready for the start of school, I am still running around arranging for things as & when the necessity pops up. So nowadays it is just chatting with other mums about the school, while dropping the kids & picking them up and making sure that S gets into regular routine everyday so that she will be fine when the school starts full day for her. As this takes up all my time & mind space, I am wondering what it will be like, once I get back to work in another fortnight!

As usual I left it for the last minute without realising that there was some work to be done in the kitchen during this week and so I ended up being one day late for this post. But as the well used saying goes ‘Better late than never’!

For this week’s Blog Hop I was paired with Priya of Now Serving. She has a very interesting mix of recipes on her blog but this one immediately caught my attention because first of all I had never used chopped Tomatoes in a Bonda or anything fried for that matter and the combination of onion & tomato is a personal favourite. The other reason was that it was very simple and quick to make.

Tomato Onion Bonda

Tomato_Onion


Ingredients

  • 1 Onion, chopped
  • 2 Tomatoes, chopped
  • A handful of fresh coriander leaves, chopped
  • Salt
  • 1 Tsp Chilli Powder
  • a pinch of Hing (Asafoetida)
  • About 3/4 cup Rice Flour (Adjust as required)
  • Oil for frying


Method: Combine the chopped onion, tomatoes & coriander leaves in a bowl. Add the salt, chilli powder & Hing and mix well, mashing with the back of the spoon.

Once the mixture lets out water, add the rice flour and mix without adding any water if possible. Although the original recipe says that no water is to be added, I had to add a few drops to enable me to shape them into balls.

Heat the oil in a deep pan. Once the oil is hot, drop the balls in it and fry on medium flame till they start to turn brown and turn crisp.

Drain and serve hot with Ketchup & Green Chutney.

My Notes: This reminded me of the Akki Rotti that we used to make at home (specially at my friend N’s place). as expected the combination of onion & tomato was delicious. The Bondas were totally crisp on the outside and soft on the inside. We need to make sure to fry them on a medium flame so that they are cooked well on the inside. A very quick & easy recipe for those evening snack cravings and also when unexpected guests drop in!

Friday, 3 September 2010

Roasted Red Pepper & Tomato Soup

I admit I said the break was going to be only for a week but here I am, after more than a month. I did come back from the holiday in a week but have been running around to sort out a lot of things, hence the delayed break on the blog front. I missed a couple of events which I try to participate every month. And the most important thing is that my unread folder in the reader is over flowing with all your lovely posts!

As for the holiday it was great & a much needed break from the routine. We went to Cornwall for a week and stayed in a chalet with another family. The weather did try to dampen our spirits (literally!) but we managed to have fun anyway. Here are a few pictures.

 Picture 104

Picture 393

Picture 464

 Picture 396

Another significant part of this holiday was that for the first time we did all the cooking while there. It was fun and a great experience rushing to make something while getting the kids ready to go out. Especially since it was our first experience with a hot plate. I have a new found respect for all those who manage to cook on a hot plate every day and manage to dish out perfect rice, gravies etc, basically anything! Even making simple tea took 2-3 attempts for us to get used to it.

Although I have been cooking regularly, I havent made anything new or that is not already on this blog but I did have this recipe waiting in the drafts folder, so I am finally posting it.

As I have mentioned earlier, Soup for a long time only meant Tomato soup and an unadulterated one at that. I did not want to add anything to it for fear of ‘ruining’ (altering actually) the taste. I did try some canned versions and even managed to finish my portion most of the times but I was still not convinced. That is until I tried the roasted red pepper version.

Red peppers have a special place in my fridge, the rule is there should always be at least one red pepper in the fridge to be used whenever the need arrives. And it is needed every 2 days usually. Apart from adding them to stir fries, Fried rice etc, we also like to have a simple sandwich with houmus (also spelt as hummus) and roasted red pepper. The best use is of course in this soup which is so simple to make that it leaves you doubtful about the way it will turn out. But it is super delicious and a great change from the regular Tomato Soup while giving you the same satisfaction.


Roasted Red Pepper & Tomato Soup

 Picture 021

Serves 2

Ingredients

  • 3 Red Peppers
  • 3 Medium sized tomatoes
  • 1 tblsp Olive oil
  • 1 small onion, chopped
  • 1-2 cloves of garlic, chopped
  • 1/4 tsp Crushed Red Chilli
  • 1/2 tsp Smoked Paprika
  • Salt & Pepper

Method:

Roasting the red peppers:

a) The red peppers can be roasted directly on the flame on your gas, in which case keep turning them to cover each area and roast them till the skin chars (turns black) and starts to loosen. This method gives a firmer result as in it is easier to handle the peppers. Just wait for them to cool down, then peel the skin, which comes off easily and then chop them coarsely.

b) The other method is to use the oven. Pre heat the oven to 220 deg C on the grill setting. Lightly grease the Peppers and place them on an oven tray as close to the heating coil as possible. Remember to keep the oven door open for the grill to work. Keep turning the peppers to get the skin charred throughout. This does take a bit more time than the earlier method but you are free to do any thing else while the oven is on. Once the peppers are roasted thoroughly, remove them into a box and close the lid or use a zip lock bag. Wait for them to cool down and all the juices to collect. Peel the skin, chop coarsely and retain the juices.

To prepare the tomatoes, bring a saucepan full of water to boil and immerse the tomatoes in the boiling water for a minute or two. Take them out when you see the skin cracking. Allow them to cool and then peel them and chop coarsely.

To make the soup, heat the olive oil in a deep pan. Add the chopped onion and garlic and fry for about 2-3 minutes. Add the crushed red chilli, the tomatoes and the Red Peppers along with the retained juices.

Add the smoked Paprika and season with salt & pepper. Add about 2 cups of water and bring it to boil. Then simmer for about 10-12 minutes until the soup has reduced a bit. This simmering will bring out the flavour in the tomatoes. The time depends upon the consistency that you want. We like the soup to be quite thick so I wait until almost all the water has reduced.

Switch off the heat and wait for it to cool down. Then blend the mixture, I use a hand blender.

Once ready to serve, heat through and adjust the seasoning.

My Notes: As simple to make as it is, it tastes way better than the canned ones. You can do the roasting part a day in advance and keep the roasted, peeled peppers in the fridge and use them the next day, which makes it even quicker to make. 


Souper Sundays2


This Soup is off to Souper Sundays being held every week at Kahakai Kitchen, where Salads & Sandwiches keep company too!

Wednesday, 9 June 2010

Gnocchi with a Tomato Basil Sauce


The little girl was circling around her mother for a long time trying to get a glimpse of what she was doing on the kitchen counter. She, the girl i.e., always liked to watch her mum working in the kitchen. giving an impression that she was trying to learn the tricks of the trade or so to speak, never mind her young age.

With all her interest in food & cooking, you would think that she must be a very easy kid to feed, but it was entirely the opposite. She was a very fussy eater and a very typical one at that. No rice, only potatoes for vegetables, moody when it came to sweets and so on. But Pasta was a different story altogether. She always liked pasta and the fact that they came in so many different shapes & sizes added to the excitement for her.


So her mother was quite confident about dinner time today since the child will have no problem with Pasta. But all that if only she would allow her to cook in peace. She chopped the tomatoes for the sauce & opened a can of chopped tomatoes as well. They all liked it to be tangy.

” I dont like tomatoes!” cried the girl. “ They are not for you, we are going to eat them.” replied her mum thinking that once the sauce was all mushy &  done, the girl will not realise that she was eating tomatoes.

She took out the basil packet from the fridge & glanced towards her attempt at a herb garden in the kitchen. The Basil was growing slowly & that made her smile and she thought that it wont be long before she would not have to buy these herbs any more. The girl had followed her glance and she got all excited at the sight of the plant. “ Look! A Beanstalk!”  “ Thats not a beanstalk, its Basil” replied her mum.

” I like Basil a lot, it tastes great!” said the girl. 

“Dont just say anything to please me, do you even know what it is & where it is used?” snapped the irritated mother.

”In the Pasta, of course!” said the girl and that definitely silenced the mother. How did she know that?

She somehow managed to finish cooking and sat to feed her daughter and was taken aback when the girl refused to eat it. “ This is not Pasta, I want Pasta!” The mother realising that she had never before seen Gnocchi, tried to explain that it was a kind of pasta, only a different shape. But the girl wouldn't have it.

” But its made of Potatoes…..” She tried one last time.” Oh! Why didn't you tell me that?” said the girl and happily started gobbling up the pasta.


                                                  *****

“Of Chalks and Chopsticks” is an event designed to let our creative juices flow and the second edition is being hosted by Sandeepa. This post will make it just in time for the event.

As for the recipe,

I am making a simple Tomato-Basil sauce for Pasta for the first time. Before this, my sauce used to have almost all the Italian spices to make it full of flavour, we being very particular about how the food should taste of something and not just the ‘seasoning’  - salt & pepper. BTW, can you even taste the finely ground black pepper if it is just sprinkled the way they show in all those cookery shows? I for one cant. It has to be loads for me!

Anyway the point here is that my Pasta sauce almost always had too many things, so when I saw this simple recipe in my favourite book, Delia’s Vegetarian Collection, I hadn't paid much attention but a few days back thought of trying it just for the sake of it. We anyway wanted a change from the usual Tomato sauce with the pasta.


The Pasta itself was different this time, Gnocchi, which is a dumpling kind of pasta generally made from potatoes.

Gnocchi with Tomato-Basil Sauce


Picture 0071

Serves 2
Ingredients
2-3 cups Gnocchi


1 Small onion, chopped
1 clove of garlic, crushed
2-3 Tomatoes


1 Can of chopped tomatoes in juice
A handful of fresh Basil leaves
1 tblsp Olive oil
Salt & Pepper
1/4 cup, cubed Mozzarella (optional)
1-2 tblsp grated Parmesan (optional)

Method:
Heat the oil in a deep pan. Reserve 1 of the tomatoes & chop the rest.

Fry the chopped onion & crushed garlic in the oil until the onion turns translucent, about 4-5 minutes.

Now add the chopped tomatoes (fresh & canned) along with 1/2 of the basil leaves. Season with salt and pepper and then let it simmer for about an hour or so. This is the part that gives the sauce all its flavour & taste. You have to wait till it thickens and reaches a chutney or jam like consistency which concentrates the flavour of the Tomato.

Then roughly chop the reserved Tomato and add this along with the remaining Basil leaves. Cook for a minute and then stir in the mozzarella if using. The cheese here is not mandatory as the sauce packs enough flavour even otherwise but it does result in a creamier texture.

Simmer the sauce for another 2-3 minutes while the mozzarella melts.


While the sauce is cooking bring a pan of salted water to boil and drop the Gnocchi in it. They take only 2-3 minutes to cook & once cooked will float on to the surface. Drain them and add the butter and season with salt & pepper. Mix well until combined.

Picture 011

To serve, place the Gnocchi in the serving bowl and spoon over the Tomato Sauce and then sprinkle the grated Parmesan over it.

My Notes:  The slow simmering of the Tomatoes works wonders here. You have to be patient with it. In fact once it is put to simmer you can carry on with other things and only check it once in a while to stir it up. At the end it will all be worth while just for the aroma it lets out!

Thursday, 3 September 2009

Spicy Tomato & Red Kidney Bean Soup

On my quest to find out as many healthy & low carb recipes as possible I had stumbled upon this one on the Tarla Dalal website. Since this was not just a tomato soup & the fact that ‘spicy’ was the key word in the name of the soup, I immediately bookmarked it but had never got along to make it. But the recent enthusiasm in eating healthy & ‘trying’ to lose weight led me to dig it out of the folder and try it out for dinner on …

Those days also saw me glued to the TV whenever there was something involving a weight loss issue. Believe it or not, I stayed up late at night to see a documentary on how Claire Richards (former ‘Steps’ group member) lost an enormous amount of weight to look good for her wedding. Now that was desperation (on my part, I don't know about her!), I admit, but around the same time I also happened to catch another documentary on BBC, which listed out 10 major ‘facts’ about losing weight. There were some that I always had an idea about such as keeping track of what you eat in terms of calories, getting that regular work out done etc, but there were others that were completely new to me e.g. the connection between weight loss & our Calcium intake. The documentary also enlightened me on the real reason behind the working of low carb diets and that they are not always suitable for everyone.

The key scientific principle which forms the basis for these diets is the relationship between consumption of carbohydrates and the subsequent effect on blood sugar (i.e. blood glucose) and on production of some hormones. Blood sugar levels in the human body must be maintained in a fairly narrow range to maintain health. The two primary hormones related to regulating blood sugar levels, produced in the pancreas, are insulin, which lowers blood sugar levels (among many other effects, most of considerable significance metabolically), and glucagon, which raises blood sugar levels.……..

…..Another aspect of insulin secretion is control of ketosis; in the non-ketotic state, the human body stores dietary fat in fat cells (i.e., adipose tissue) an preferentially uses glucose as cellular fuel. By contrast, low-carbohydrate diets, or more properly, diets that are very low in nutritive carbohydrates, evoke less insulin (to cover the ingested glucose in the blood stream), leading to longer and more frequent episodes of ketosis. Some researchers suggest that this causes body fat to be eliminated from the body although this theory remains, at best, controversial, if it refers to excretion of lipids (i.e., fat and oil) and not to fat metabolism during ketosis.(Source:Wikipedia)

Another point made by the documentary was that soups are always better if you want to control your hunger & eventually the intake of food. They performed this experiment on 2 groups of people working in the same unit, putting in equal hours & doing the same job. One group was given normal lunch along with a glass of water to be had after their meal, while for the other group they simply blitzed the same lunch with that glass of water to make it into a ‘soup’. Each of these groups were observed after an interval of 1-2 hours and asked how they felt & the group that had the ‘soup’ felt fuller for a longer time.

That was enough motivation for me to try soups, otherwise for me it always meant the odd Tomato or Sweet corn soup in an Indian Restaurant or more recently Heinz Cream of Tomato Soup. So this one was a prefect transitional soup, having tomatoes but being a little different from the soups that I am used to. Whats more, its very simple to make as well.

Spicy Tomato & Beans Soup

Picture 287

Ingredients

  • 3-4 cups chopped Tomatoes
  • 1 cup cooked Red Kidney Beans
  • 1 medium sized onion, chopped
  • 1 clove of garlic, chopped
  • 1 tblspn Olive Oil
  • 1/2 tsp Red Chilli powder (Adjust according to taste or spice level)
  • 1 tblsp chopped basil (I used dried)
  • 1./2 tsp Oregano
  • 1/2 tsp Sugar
  • salt & Pepper

Method:

Heat the olive oil in a pan and sauté the onions & garlic till the onions turn translucent.

Add the tomatoes & the chilli powder and cook till the tomatoes are mushy.

Add 3 cups of water, bring to a boil and then simmer till the tomatoes are completely cooked.

Blend this mixture either in a food processor or use an immersion blender and then return this to heat.

Add the red kidney beans, oregano, basil, sugar, salt & pepper and continue to heat for about 5-7 min.

Serve hot.

Picture 297

My Notes: We found that this soup was quite filling because of the Red Kidney beans and we didn't need anything else to go with it.

Sunday, 1 March 2009

Roasted Red Pepper & Baby Corn Lasagne

I had made Lasagne for the first time around 3 yrs back, following a recipe from Tarla Dalal. I get these set of recipes emailed to me every week since I registered on the official website. This particular Lasagne recipe sounded simple enough and even included the steps for making the Lasagne sheets and that seemed quite easy too. But I had never had lasagne before so when the recipe asked the pasta dough to be cut into strips I actually cut them into thin ones, just like Fettuccine (As you can see my knowledge of pasta has improved a lot since then!). Well, the recipe did say 'Strips' so strips were what I made and dropped them in the sauce and the whole thing then went into the baking dish along with lots of cheese. The end result was tasty nevertheless and till date whenever I make 'that' lasagne, even though I know they are supposed to be sheets, I still cut the dough into strips.

But that is not the recipe being presented here. I Just wanted to add some veggies along with the sauce and instead of adding them as is, I roasted them a bit. The choice of veggies was also not thought upon. I always have baby corn in the fridge and peppers too, this time it happened to be a red one. But the combination turned out to be a very good one.

And this one uses 'real' Lasagne sheets, store bought. The pack mentioned that pre cooking was not required so I used them straight out of the pack. But next time I might boil them for a couple of minutes before assembling the lasagne. The thing with these sheets is that if your sauce has enough liquid content in it & the sheets are well covered with it during baking, they get cooked well. In my case I felt that it should have been cooked just a little more.

Serves 2

Ingredients

  • 1 Red Bell pepper, diced
  • 5-6 Baby Corns, Cut lengthwise
  • Olive Oil
  • Salt & pepper

For the Tomato Sauce

  • 1 tblsp Olive oil
  • 2 cloves Garlic, finely chopped
  • 1 small onion, finely chopped
  • 1 Jalapeno Chilli, chopped
  • 2 tomatoes, chopped
  • 1 cup Tomato Passat (Sieved Tomato paste)
  • 2-3 tsp Mixed dried herbs
  • 1/2-1 tsp Red Chilli powder
  • Salt

For the white sauce (Béchamel Sauce)

  • 2 tblsp Butter
  • 2 tblsp Plain flour
  • About 2 cups of milk
  • Salt & Pepper

6 Lasagne sheets

1 Cup Grated cheese (I used Double Gloucester, since thats what I had. You can also use Mozzarella or Cheddar)

Crushed Red Chilli Flakes

Method:

Pre heat the oven to 200 deg C on broiler setting. Arrange the baby corn & Red Pepper on a baking sheet.

Picture 001

Drizzle with Olive oil and sprinkle salt and pepper powder. Mix and place in the oven for about 10-15 min or till the edges are brown & crisp. Keep aside until required.

For the Tomato sauce, heat a pan with the Olive oil. Add the garlic & onion and saute till the onion turns translucent. Add the Chilli and chopped tomatoes. Cook till the tomatoes are mashed properly.

Picture 0141

At this point add the tomato paste, dried herbs, salt and red chilli powder. Mix well, cover and cook for about 10-12 minutes. Switch off when the sauce achieves a paste like consistency.

For the white sauce, Heat a non stick saucepan and melt the butter in it. Add the flour little by little and keep stirring for the flour to be properly mixed with the melted butter.

Remove the pan from the heat and add 1/2 cup of milk, whisking at the same time for the milk & flour-butter mixture to be mixed without forming any lumps. If you think the quantity of milk is not enough add some more out of the remaining milk. Once everything is mixed properly, return the pan to heat and add the remaining milk little by little, whisking as you do so.

Heat this mixture on a medium flame and the sauce will begin to thicken.

Picture 013

Once the sauce is thick enough but of pouring consistency, switch off the flame and season with salt & pepper.

To assemble, lightly grease a baking dish and spoon in 1/4 of the tomato sauce. Place 2 lasagne sheets on this. Top this with another 1/4 of the Tomato Sauce. Arrange 1/3 of the roasted veggies and top them with 1/3 of the cheese.

Now place 2 more lasagne sheets on the cheese and again add 1/4 of Tomato Sauce, 1/3 of the veggies and 1/3 of the cheese. Repeat once more, reserving some of the remaining cheese.

Top this with the White sauce to coat evenly. Sprinkle with the reserved cheese & the chilli flakes and bake at 200 deg C for 20-25 min or until the sauce begins to bubble and the cheese starts browning.

Just before going into the oven:

Picture 019

All done & ready to be served

Picture 021

This picture of the is my entry for this month's Click, the theme is Cheese/Tofu.

And Served hot:

Picture 0351

Note: Its better to make the white sauce just before you start assembling the Lasagne as it will start to thicken even more when it is cooled.

The classic White sauce recipe asks for nutmeg powder to be added along with the salt & pepper, I don't like the nutmeg flavour too much so I have skipped that. You can also add grated cheese to the sauce to make it richer.

Some Lasagne recipes ask for the white sauce to be added between the layers as well but I have avoided that as we like the taste of tomato sauce to be dominant.

Wednesday, 11 February 2009

Raw Tomato Chutney

Raw Tomatoes are rare to find where I stay, so when I saw them at a vegetable stand, I filled up my bag, about 18-20 of them. I brought them back home happy with the loot & then started wondering what I will do with such a huge lot.

The Chutney was of course the first thing on my mind but I did not want to make it out of all the tomatoes because I wasn't sure if such a huge quantity will survive in the fridge for long. Lets keep half the tomatoes as they are, if we aren't able to do anything with them, they will ripen & then we can use them as normal tomatoes, we decided.

But the tomatoes never got a chance to 'age'. The chutney made with half of them got over in no time & within 4 days I was making the second lot, yes the same chutney, which also got over in 3 days time. This was some 2-3 weeks back and I am already missing it and looking forward to finding some more tomatoes in the market!

Basically, I love this chutney. This and a few more made in a similar way - Pumpkin peel, Ridgegourd peel etc. The addition of Til (Sesame) makes them very unique.

These chutneys were a regular at our home, the favourite one being the Ridgegourd peel. While we used a Mixer/Grinder, back in the village, the chutney was ground on stone and had a unique taste of its own. It would then be served with Hot Bhaakris (Jowar Flatbreads). The ritual after that was to make a small hole in the chutney mound and raw Peanut oil would be poured in, mixed and then devoured. Nobody had heard of cholesterol over there or rather they never had to, since right after this meal, most of them would be seen toiling hard in the fields, except of course us vacationers!

Raw Tomato Chutney

20Aug08 008

Ingredients

  • 1/2 cup Til (Sesame seeds)
  • 8-10 medium sized Raw(green) Tomatoes
  • 6-8 Green Chillies (Alter acc to taste)
  • 8-10 Curry Leaves
  • 2-3 Garlic cloves
  • 1 tblsp Tamarind pulp
  • 1-2 tblsp grated Jaggery (Acc to taste)
  • Salt

Method

Lightly roast the sesame and keep aside.

Heat oil in a Pan. When hot, add the curry leaves & fry them for a minute.

Add the green chillies and fry well for about 3-4 min on low flame. Add the Garlic cloves and continue to fry for another 2 min.

Wait until the Chillies are properly roasted & then add the chopped tomatoes.

20Aug08 007

Roast them until they turn soft & mushy. At this point switch off the flame and add the grated Jaggery and tamarind pulp.

Allow this mixture to cool. Then add the salt & the roasted sesame seeds and then grind it to a coarse/fine consistency depending on your preference. As far as possible, avoid using water for this. If you have to add water, do it spoon by spoon.

This chutney, is a great accompaniment to the daily meal (both Chapati & rice) and also tastes delicious spread on toast.

Note:

If the chillies are not roasted properly, the chutney turns out to be very very hot without any real taste of the tomatoes, so be careful & make sure they are properly roasted/fried in the oil.

The qty of Jaggery can be adjusted according to taste, I personally don't like it very sweet so I use only 1 tblsp but anything up to 2 tblsp should be acceptable.

The sesame seeds can be replaced by peanuts but there will be a slight change in the taste. This will also taste good but different. If you have problem grinding this with the tomato mixture, dry grind it after roasting and then mix it with the tomato mixture for the final grinding.

This Chutney goes to Ramya's Mane Adige for her Chutney/Dip Mania event.

Monday, 24 November 2008

Breaking the Routine with Pasta

I will be taking a break from blogging for a month, as I am off to India tomorrow. While some of you may be muttering " lucky girl!", some of you may be saying "me too!" and some others " I wish I could go too...", I have mixed feelings about going to India this time. I am wary and apprehensive that this trip will bring back sad memories about a personal tragedy which recently took place, those memories which I have been trying hard to cope with and have pushed them far behind only to come back to me now.

At the same time I am happy & excited about a wedding in the family. Also this is our first trip to India since S has become old enough to understand (not completely, but still...) where she is going. It is going to be fun to see her reaction and understand what she feels about things over there.

I am also feeling bad that I will miss being here in London for Christmas. This would have been my fourth in this city and I remember being excited every year. Waiting eagerly to see if it would be a white Christmas every year, checking out the shops for Christmas deals, gawking at the decorated Christmas trees everywhere you go, setting up the tree at home and so on. In spite of all this, when Christmas actually arrives, it brings along with it a sense of sadness. Its a drastic change from the hustle bustle a day earlier to the quiet lonely streets on the all important day. The town centre wears a deserted look, even the otherwise 24 hrs open Food & Wine shops are closed and you either stock up on essentials such as Milk or be very careful about how you use the only 'Can' you have at home!

But then I think of meeting all my dear ones (family & friends), the delicious food (read street food) I will be gorging on and I really don't mind being away during Christmas. See, I already told you that I have mixed feelings about this!

But enough of my ramblings now, let me come to the food part now. Apart from being one of our favourite fast foods here, Pasta is a great routine breaker for us. Although Indian food is the staple for us, we do try out different cuisines and I try to recreate them at home whenever I can. Pasta, mainly with a Tomato based sauce features very frequently. The first time I made it, I searched high & low for a good recipe and found that a single recipe either did not suit my palette or was not simple enough to make. So I took whatever I liked from each of the recipes and created this one.

The tomato sauce resembles the classic Marinara sauce but is still different. I am not a cheese person, although GM loves it. To accommodate both of us I use very little cheese while cooking the sauce/Pasta and then add it for him.

Pasta in a Tomato Sauce
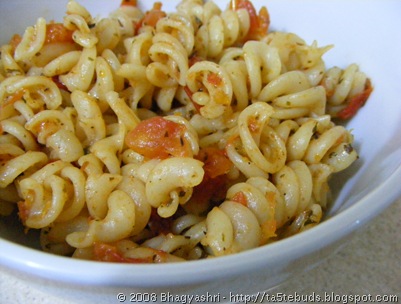
5Aug08 056

Serves 2

Ingredients

  • 200 gm Pasta (Penne, Fusilli or Farfalle)
  • 4-5 Vine tomatoes, chopped
  • 2-3 cloves garlic, finely chopped
  • 2 tblsp Virgin Olive oil
  • 3-4 tsps Italian dried mixed herbs (Oregano, Thyme, Basil, Sage, Parsley)
  • Salt
  • Crushed Black Pepper
  • 1 cup grated cheeses (Cheddar, Mozzarella or Red Leicester)

Method:

Heat the olive oil in a pan. Add the chopped garlic and fry taking care not to burn it.

Add the tomatoes when the garlicky smell spreads through the kitchen, before the edges of the garlic start to brown.

Cook on medium flame till the tomatoes are soft. Crush the bigger tomato pieces with the back of the spoon and continue to cook till you get a nice saucy texture.

Add the Italian herbs, salt and black pepper. Mix and cook on low heat with a cover for about 5-7 minutes.

Meanwhile in a large pan, put 8-10 cups of water to boil and add salt to it. Once the water starts to boil, add the Pasta and cook for about 6-8 minutes. The pasta has to be cooked al dente..I know that everyone will tell you this, but it really is very important as otherwise you will end up with a soggy heap of broken/disfigured pasta in the sauce. But at the same time it is important to cook the pasta thoroughly. Please refer to the packet instructions for the exact details about the amount of water and the time for which it is to be boiled.

Once done, drain the pasta and mix a little olive oil and keep aside.

Remove the cover for the sauce and add the cooked pasta and mix well to coat the sauce evenly on the Pasta. Cover again and cook for 3-4 minutes.

Now add 1/2 cup grated cheese. Mix and return to fire with the cover on and cook on low heat for 2-3 min until the cheese melts. Sprinkle the remaining cheese and serve.

This last step can also be done in a conventional oven. Mix the cheese with the pasta and transfer to a baking dish. Sprinkle the remaining cheese on top and bake in a pre heated oven at 180 deg until the cheese melts and starts to brown. Remove from the oven and serve hot.

I sometimes add Baby Corn (blanched & added to the sauce before the pasta), Sweet corn (added along with the pasta to the sauce), pickled Jalapenos (added a minute before serving) or grated Parmesan Cheese (sprinkled on the top while serving) depending on the mood for the day.

I leave you with this Pasta recipe now. I will be back after a month. Until then Happy browsing and if there's anything you would like to tell me about this blog, any suggestions, queries, recipe requests etc, please drop me a line by using the 'Contact me' link on the side bar.

Oh..and Merry Christmas, well in advance!!!

Friday, 29 August 2008

Pav Bhaji with home made Pav from Jugalbandi

Pav Bhaji is a regular with us for many reasons. First & foremost because we love it so much! Then, the simplicity of the recipe and a feeling of having had something special for lunch/dinner :)

GM makes great tasting Bhaji and I have still not been able to match that although I follow the same recipe and both of us use the same Masala powder! But he is too modest to admit that and prefers that I make the bhaji every time. And no he is not trying to escape the working in kitchen because when we make Pav Bhaji he is the one who chops the vegetables and gets everything ready most of the time :)

So, while we get to eat the almost authentic Bombay restaurant style Bhaji, what we miss, or rather used to miss is the Pav. We get a lot of different breads here, soft buns, burger buns, rolls, baguettes and so many more but not the real Ladi Pav which, if you ask me, is a must for that authentic feel to Pav Bhaji.

Imagine my reaction when I saw the recipe for these Pav along with a host of information about the same and the very necessary Amul Butter at Jugalbandi! I was happy and apprehensive at the same time. Finally there was a possibility that we could have real Pav with the bhaji now, but I was apprehensive because I had never tried my hand with Yeast baking before, meaning I had never ever made bread at home. But on seeing the easy recipe was totally tempted to try it.

So on Friday, we had Pav Bhaji with the real Pav! But as always I was so excited & in a hurry to try them out that I misinterpreted one step and applied the butter on the surface much earlier than was required, the result being that the outer crust of the Pav turned out to be a little crispier.

Now, Jai & Bee, as always have given the healthier option of using whole wheat, but since I wanted the 'authentic' Pav and was ready to forego the health part, I used Maida (Plain flour) instead.

20Aug08 427

I am sending this to Zlamushka for the Tried & tasted event, where Jugalbandi is the featured blog of the month.

Recipe for the Bhaji

Ingredients

  • 4-5 medium sized Potatoes
  • 1 small Green Capsicum
  • 1/2 cup Green peas
  • 5-6 florets of Cauliflower
  • 1 medium sized onion, finely chopped
  • 3 medium sized tomatoes
  • 2-3 cloves of garlic
  • 2-3 Green chilies
  • 3 tsps Pav Bhaji Masala
  • 1-2 tsp Red Chili Powder
  • 3-4 tsps Fresh Coriander leaves, chopped
  • 2 tblsp butter for the Bhaji and lots more for the Pav
  • Salt
  • Finely chopped onions, lemon slices & fresh coriander

Method:

Boil the potatoes, peel, mash & keep aside.

Boil the other vegetables as well - peas, cauliflower, capsicum in this case. You can use a lot of other vegetables but we prefer to keep it simple and use only the above mentioned, cauliflower also getting axed sometimes. Once they are boiled, mash these too and keep aside.

Grind together the green chilies and the garlic to make a paste.

Heat the butter in a pan and fry the onions. Continue to fry till the onions start turning brown. At this point add the chilies-garlic paste and fry for some more time(abt 3 min). The bhaji gets a lovely colour because of the browning of the onions.

Add in the chopped tomatoes and cook till they are tender.

Add the Pav Bhaji Masala, red chili powder and salt and saute. Once the spices are mixed thoroughly add the mashed potatoes and mix.

Add the other mashed vegetables and mix and cook on medium flame.

If the bhaji is very dry add a little water to thin it out, as little as possible. Adding too much water will spoil the consistency of the bhaji and also affect the restaurant style taste. In fact the bhaji made in restaurants does not have any water at all and the semi solid consistency is obtained by adding huge amounts of butter to the bhaji while mashing it on a large Tawa (Griddle). Since this is practically not possible at home, I add a little bit of water.

Add the chopped coriander leaves and give it a stir and let it heat for another 5 min before turning off the flame.

To serve, slit the Pav into halves and roast them on a griddle with lots of butter. You cant get stingy with the butter here, its a must!

20Aug08 436

Serve the Bhaji with a dollop of butter along with the Pav, chopped onions, lime slices and garnished with coriander leaves.

To make things spicier, mix red chili powder and a little Pav Bhaji masala along with salt and a few drops of lime juice with the chopped onions. Any one who wants it hotter can add the spiced up onions to the Bhaji!

Thursday, 14 August 2008

Paneer Tikka Masala

I don't know why but I remembered Saeed Jaffrey's 'Tandoori Nights' when I sat down to write this post. For those who don't know or dont remember, Tandoori Nights was a serial that was telecast on Doordarshan at least 15 years back (don't remember the exact period), when I was in school. This serial, originally from BBC, was based in London and revolved around Saeed Jaffrey's character who ran an Indian Restaurant in London.

One reason could be that the serial was based in London and I have not seen any other people other than Londoners so fond of the Tikka masala. Of course there preference is the Chicken Tikka, but since I am a vegetarian, Paneer Tikka finds a place in our home & our menu whenever we are at an Indian Restaurant. I didn't have an idea how popular this is with the British here until I was speaking to this gentleman, who happened be GM's manager's brother. The minute we told him that we were from India he went " Aaah India! Goa! Taj Mahal! Elephants! Chicken Tikka!!! Incidentally are these the only things that India has to boast of?

Another reason could be the association with 'Tandoor' which is where the Naans are traditionally made. And Paneer Tikka Masala tastes best with these Naans. Incidentally the Tandoor also reminds me of 'Sanjha Chulha' a serial which used to be telecast on Doorarshan long back. Didn't we see a very young looking Shahrukh Khan in it? Apart from his 'Fauji' of course. And why am I getting so nostalgic about old Doordarshan serials all of a sudden!

But getting back to the real topic I also remember that when I was old enough to understand menu cards and had come across this dish, I thought that this must be Paneer Tikha (Hot & Spicy) Masala and the colour of the gravy served like a confirmation. It was only much later that I came to know about the 'Tikka' and have been a fan of this dish since then. In restaurants they use Tandoori colour which gives the Paneer as well the gravy that orangeish kind of red colour.


Ingredients
For the Paneer tikkas

  • 2-3 cups Paneer cubes
  • 1 cup diced onion, tomato & Capsicum
  • 1 tsp Red Chili powder
  • 1 tsp Garam Masala Powder
  • 1-2 tsps Ginger garlic Paste
  • 1/2 tsp Haldi (Turmeric)
  • 1 cup beaten Curd
  • Salt

For the gravy

  • 3 Tomatoes
  • 3 Onions
  • 2-3 tsps Khuskhus (Poppy Seeds)
  • 3-4 Cloves
  • 1" of cinnamon
  • 2-3 Cardamoms
  • 2-3 tblsp Cashewnut
  • 2 tsps Kasuri methi
  • 1-2 tsps Red Chili powder
  • 1/2 tsp Turmeric powder
  • 1 -2 tsps Coriander powder
  • 1 tsp Cumin powder
  • 1 tsp Sugar
  • 2 tblsp Oil
  • Fresh Cream
  • Salt

Method:

For the Paneer Tikka: Mix together all the spices & ginger-garlic paste with the curd and add the paneer pieces & the diced vegetables to coat them well. Keep aside for at least an hour.

Heat oil in a pan and shallow fry the paneer pieces until they turn golden brown. Alternatively this can also be done in the oven by roasting the paneer at 200 deg C for approx 20 min. The oven option is obviously a healthier one. Repeat with the onion, tomato & capsicum without cooking them too much.

For the Gravy: Grind the onions to a paste. Grind together the khuskhus & cashewnuts and make a paste. Blanch the tomatoes and puree them. Mix all the spice powders except for the kasuri methi with a little water to make a paste. This is done so that the spices dont get burned when added to the heated oil.

While the preparations might sound quite elaborate, the end result is worth every effort, trust me :)

Heat oil in a pan. Add the sugar and stir. The sugar will slowly caramelise and the oil will get a rich golden brown colour. At this point add the cloves, cinnamon and cardamom and fry them till you get a nice aroma.

Add the onion paste and fry well. Add the masala paste and mix well and fry for a minute. Then put in the Cashew-Poppy paste and fry.

Add the kasuri methi and then the tomato puree and cook till the gravy gets a little dry & oil starts separating from the sides.

Add the Paneer Tikka, onion, tomato, capsicum and salt and mix well. Cook for 5 more minutes and then add the cream and turn off the flame. If you want a thinner gravy add more cream but not water.

2008_0421fuji0034

As mentioned earlier, this pairs best with Tandoori Naans. In their absence, serve it with rotis/phulkas/parathas.

Pooja of My Creative Ideas is hosting an event, Theme of Week, on the occasion of Independence Day, where the entries have to relate to the Indian Tri Colour. I happened to click the diced veggies which I am sending to this event.

2008_0421fuji0020

What an irony! I am celebrating the Indian Independence with a post about an Indian Dish, most popular among the British, from whom we got the Independence in the first place! :)

HAPPY INDEPENDENCE DAY!

Tuesday, 3 June 2008

Back after a break...

Its always good to have a break in between, even if you enjoy doing something. I took a break from blogging for a few days owing to my suddenly planned India trip. The trip was impending as it was S's first Birthday & we wanted to celebrate it amongst family members. It was sudden because as opposed to the original plan where I would have got only 4 days in India, I got to spend almost a month there, thanks to GM's suddenly cropped up official work. This of course meant that I missed some of the blog events which were otherwise in the schedule & in the planning stage! I still somehow managed to contribute to Meeta's Monthly Mingle.
As for the trip, it was super just like all India trips always are. Hectic to the hilt but memorable nonetheless. We are still trying to cope with the jetlag which comes as a package deal with such trips!
One of the events I felt very bad about missing was Dhivya's A.W.E.D Mexican, specially because the post was almost ready and the Mexican meal had already been devoured by us, but I just did not get the time to post it. So let me start the 'Break ke Baad' posts with this one.
Both me & GM are fond of trying out new cuisines whenever we get a chance. We are open to any kind of Vegetarian food but prefer something which is closer to our Indian tastes, flavourful & on the spicier side apart from being substantial. In that sense, Mexican cuisine fits the bill perfectly. We often go to this Mexican restaurant called Cheeko's very near to our place. Everything that we have tasted has been absolutely delicious and makes us go back for more. The portions are just perfect - not too heavy but filling at the same time. They have recently started serving Indian cuisine too - all the more reason for us to visit this restaurant!
The A.W.E.D. event prompted me to make Mexican after a long time at my place. Thanks Divya for coming up with such a lovely event.
I decided that we would have a complete Mexican meal instead of just one dish. So I made Nachos, Guacamole and Bean Enchiladas for dinner last week. Enchiladas makes a regular appearance at our dining table but Nachos and Guacamole were something I had never made at home. The first task was to get all the ingredients together. I saw GM giving me strange looks
while I was picking up the Avocados for the Guacamole, during our weekly grocery shopping. We had never bought Avocados before this. But ever since I started blogging, he has got used to buying different veg/fruits that we had never thought of getting home earlier.
Without any further chit chat, here are the recipes.

Nachos
Tortilla chips
Salsa
Cheese (I used mature Cheddar)
Baked Beans
Pickled Jalapeno chillies


For the Salsa
3 medium sized Tomatoes, finely chopped
1 medium sized Onion, finely chopped
1 Capsicum, finely chopped (I used half a green and half a yellow pepper)
Cucumber, finely chopped
Fresh Coriander leaves.
1-2 Chillies
1/2 tsp Garlic paste
Salt
Method:
Combine all the ingredients in a bowl and store for at least 1-2 hours for the flavours to mix properly.

To assemble:
Arrange the Tortilla chips on a baking sheet in a circular manner. Cover most of the chips with the Salsa, also add the jalapeno chillies
.
Arrange another layer of chips over this. Add the grated cheese and bake for 5-10 min at 180 deg C or until the cheese melts. Another variation could be adding a layer of baked beans and then adding the grated cheese.


Guacamole
2-3 Avocados
1 small Onion, chopped
1 small Tomato, chopped
Fresh corainder leaves
1 clove of Garlic
1-2 chillies
2 tsp Lime juice
salt
Method:
Cut the Avacados into halves, reserve the pits/seeds and scoop out the flesh. Mash this using a fork. Add the rest of the ingredients and either pound in a pestle to desired consistency or puree it out. Now the traditional Gaucamole is supposed to be a little chunky meaning it is not pureed to form a paste but I preferred to blend it out. As regards to the seeds, when I was searching for the recipe for Guacamole, some sites suggestedthat adding the seeds to the prepared Guacamole will prevent discolouration of the same. But when I reached the Wikipedia, it completely dismissed this notion saying that Guacamole will get discoloured once it comes into contact with the oxygen in air, no matter what you do. Read more about it here.

This makes for a good dip with the nachos.

Enchiladas
2 Tortillas
Tomato Sauce
Filling
Cheese


For the tomato sauce
1 tsp Olive oil
4-5 ripe Tomatoes, boiled & pureed
2 cloves Garlic, crushed
2-3 tsp Mixed herbs (Basil, Thyme, Sage, Marjoram, Oregano)
1-2 tsp Red chili flakes


Method:
Heat olive oil in a pan. Add the crushed garlic and saute. Add the tomato puree, mixed herbs and chili flakes and let this cook for 10-15 min or until the mixture thickens.


For the filling
1 tsp Olive oil
Baked Beans
1 small onion, sliced
half a Capsicum, chopped
Salt
Pepper
Method:
Heat olive oil. Saute the onions and capsicum for sometime. Add the baked beans and cook on high flame. Season with salt and pepper powder.


For the Tortillas
1/2 cup Wheat flour
1/2 cup Cornmeal
salt
1 tsp mixed herbs

Method:
Prepare a stiff dough with all the above ingredients. Roll out thinly and cook on both sides on a griddle.

To assemble:
In a baking dish, pour half of the tomato sauce. Lay down the tortillas. Add the filling and fold the tortillas into wraps.
Pour in the remaining sauce. Add grated cheese on top and bake for 10-15 min at 180 deg C or until the cheese melts.

This is usually served with rice, but for us this along with the Nachos was more than filling!